Introduction
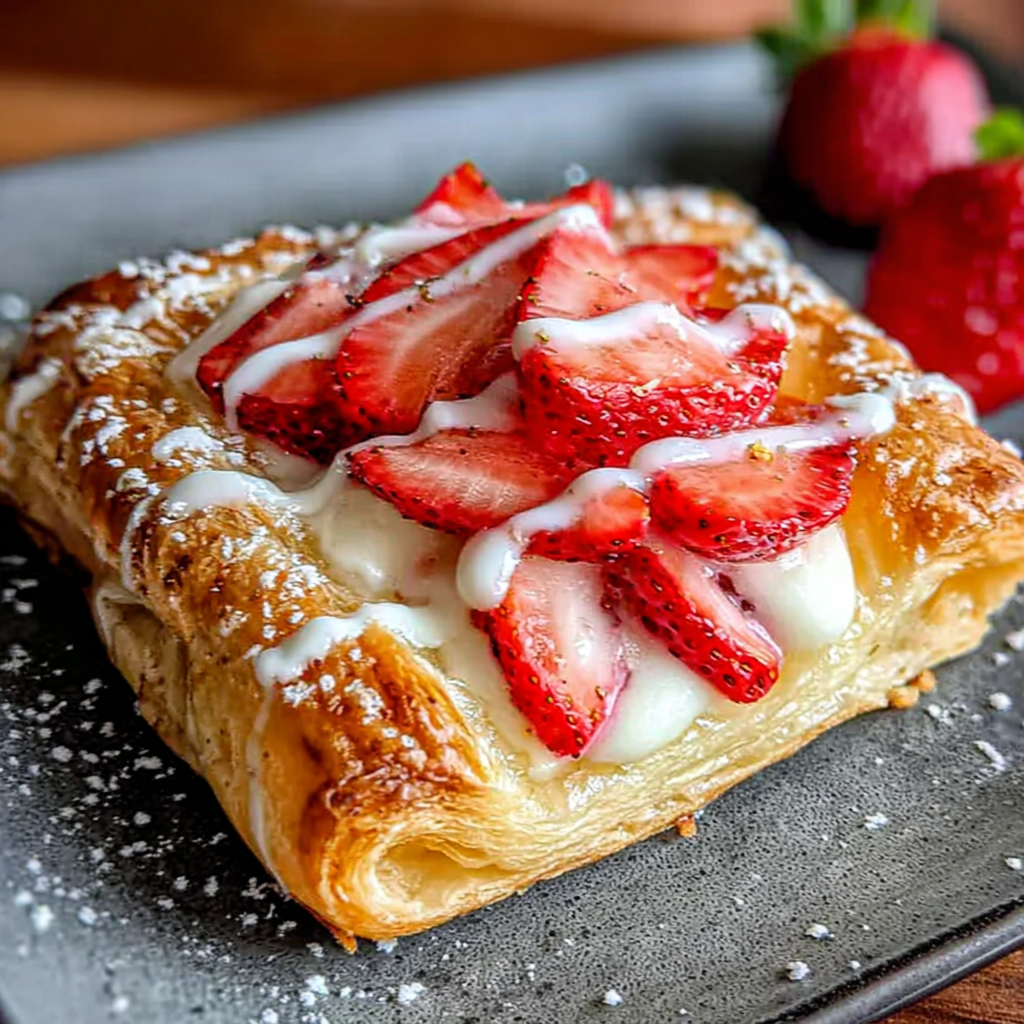
There's something undeniably charming about a freshly baked Strawberry Danish, with its flaky layers and sweet fruit filling. This classic pastry makes for an inviting breakfast treat or an elegant addition to any brunch table. With the right techniques, you can create this delightful dessert in your own kitchen, impressing family and friends with your baking skills.
The combination of buttery pastry, cream cheese, and vibrant strawberry filling creates a romantic dance of flavors. Each bite is a reminder of sunny mornings and leisurely afternoons, making it a beloved choice for any time of day. In this article, we'll walk through the essential ingredients and steps to achieve that perfect Strawberry Danish.
Baking may seem daunting, but with some patience and practice, anyone can master this pastry. So, roll up your sleeves, preheat that oven, and let’s dive into the wonderful world of homemade pastries. You’ll not only enjoy the process but also savor the rewarding results.
Ingredients
- 1 sheet of puff pastry (thawed)
Puff pastry acts as the base for the Danish, providing a flaky and buttery texture. The layers create a delightful crunch that holds the filling without becoming soggy. - 1 cup fresh strawberries (hulled and chopped)
Fresh strawberries lend a bright, fruity flavor that balances the richness of the pastry and filling. They can also be gently cooked down to enhance their sweetness. - 1/4 cup granulated sugar
Sugar is essential for sweetening the filling. It also helps draw out the juices from the strawberries, making a lovely sauce that complements the Danish. - 1 tablespoon cornstarch
Cornstarch will thicken the strawberry filling, preventing it from becoming too runny. This ensures a stable filling that sits perfectly inside the pastry. - 4 oz cream cheese (softened)
Cream cheese adds a rich, creamy element to the filling, providing a nice contrast to the fruit. Its slight tanginess balances the sweetness of the strawberries. - 1 egg (beaten) for egg wash
An egg wash gives the Danish a beautiful golden-brown color and a shiny finish when baked. It helps improve the presentation of the final product. - 1 tsp vanilla extract
Vanilla extract enhances the overall flavor profile of the filling, adding depth and a subtle sweetness that marries well with the strawberries.
Directions & Preparation
Step 1: Preheat your oven to 400°F (200°C).
Preheating the oven is a critical first step in baking. It ensures that your Danish will start cooking immediately once placed in the oven, leading to even cooking and a nicely risen pastry.
Step 2: Roll out the puff pastry on a floured surface.
Gently rolling out the puff pastry helps create a uniform thickness, which allows for even baking. Flour your surface to prevent sticking, and try to keep the dough cold to maintain its flaky structure.
Step 3: Cut the pastry into squares approximately 4 inches by 4 inches.
Cutting the pastry into uniform squares creates a consistent shape for each Danish. This uniformity not only enhances visual appeal but also ensures even cooking across all pastries.
Step 4: Make the cream cheese filling by mixing softened cream cheese, sugar, vanilla extract, and a bit of the fresh strawberries in a bowl.
Combining the cream cheese with sugar and vanilla creates a rich filling that contrasts delightfully with the strawberries. Mixing in some chopped strawberries incorporates their flavor directly into the mixture.
Step 5: Take each pastry square and place a spoonful of the cream cheese mixture in the center.
Placing the filling in the center helps to contain it while baking. This ensures that the filling maintains its integrity and remains deliciously gooey without leaking out.
Step 6: Spoon the remaining fresh strawberries (mixed with cornstarch) on top of the cream cheese filling.
Adding the strawberries on top of the cream cheese filling allows the beautiful red color to shine and ensures every bite is packed with flavor. The cornstarch will help keep the filling from becoming too runny.
Step 7: Fold the corners of each pastry square towards the center, pinching them together to secure.
This step is essential for creating the Danish shape and ensures that the filling stays put during baking. Properly sealing the corners will help achieve a well-formed pastry.
Step 8: Brush the top of each Danish with the beaten egg for a golden finish.
The egg wash not only adds color but also gives a slightly glossy look to the pastry. This step enhances the overall presentation, making your Danish visually appealing.
Step 9: Place the pastries on a baking sheet lined with parchment paper.
Using parchment paper prevents the pastries from sticking to the baking sheet, allowing for uniform heat distribution. It also makes cleanup much easier after baking.
Step 10: Bake in the preheated oven for 20-25 minutes until golden brown.
Baking time is crucial; keep an eye on them as they approach the 20-minute mark. The goal is to achieve a beautifully golden-brown pastry that signals it’s fully cooked and flaky.
Step 11: Let them cool slightly before serving.
Allowing the Danish to cool slightly helps the filling set, making them easier to handle. Enjoying them warm is ideal, as the flavors will be most vibrant at that temperature.

The Perfect Strawberry Filling
Creating a perfect strawberry filling is vital for a successful Danish. The combination of fresh strawberries with a touch of sugar elevates their natural sweetness and preserves their vibrant color. The cornstarch thickens the mixture, ensuring it remains stable without overwhelming the pastry, making each bite a delight.
Working with Puff Pastry
Puff pastry is the heart of the Danish texture, creating those coveted flaky layers. When handling puff pastry, it’s crucial to keep it cold to maintain its structure. Ensure minimal handling to prevent it from becoming warm and sticky; proper techniques can lead to beautifully risen pastries that are light and airy.
Serving Suggestions for Your Danish
While Strawberry Danish is delicious on its own, consider pairing it with a dollop of whipped cream or a scoop of vanilla ice cream for an extra touch. Their creamy textures complement the sweet, fruity flavor, making for a delightful dessert experience. A light dusting of powdered sugar on top can also enhance your presentation.
FAQs
What if my strawberry filling is too thin?
If your filling is too runny, consider adding a bit more cornstarch to thicken it. You can also cook the mixture slightly on the stove to reduce and concentrate it before using.
Can I use frozen strawberries instead of fresh?
Yes, you can use frozen strawberries, but make sure to thaw and drain them well to prevent excess moisture from ruining your filling.
Why did my Danish turn out bland?
If your Danish lacks flavor, ensure you’ve added enough sugar to the filling. A sprinkle of salt can also enhance sweetness and overall taste.
What should I do if the puff pastry is hard to work with?
If the puff pastry becomes too soft, chill it in the refrigerator for a few minutes. This will firm it up, making it easier to handle.
Can I adjust the sugar level in the filling?
Yes, you can modify the sugar based on your taste preference. Reduce it for a less sweet filling or add more for extra sweetness, especially if your strawberries are tart.
What happens if I overbake the pastries?
Overbaking can lead to a dry pastry, so keep a close watch in the last few minutes of baking. The ideal Danish should be golden brown and flaky, not hard.
Conclusion
Baking a Strawberry Danish at home is a satisfying endeavor that rewards you with a delicious treat. With a few simple ingredients and some care in preparation, you can bring the charm of a bakery to your own kitchen. Each bite offers a perfect balance of flavors, and you'll feel proud of your creation.
So, whether it’s for a special occasion or just a casual morning treat, this Strawberry Danish can become a delightful staple in your culinary repertoire. Happy baking and enjoy your delicious accomplishment!
Recipe Card

Creating the Perfect Strawberry Danish at Home
Ingredients
- 1 sheet of puff pastry thawed
- 1 cup fresh strawberries hulled and chopped
- 1/4 cup granulated sugar
- 1 tablespoon cornstarch
- 4 oz cream cheese softened
- 1 egg beaten for egg wash
- 1 tsp vanilla extract
Instructions
- Preheat your oven to 400°F (200°C).
- Roll out the puff pastry on a floured surface.
- Cut the pastry into squares approximately 4 inches by 4 inches.
- Make the cream cheese filling by mixing softened cream cheese, sugar, vanilla extract, and a bit of the fresh strawberries in a bowl.
- Take each pastry square and place a spoonful of the cream cheese mixture in the center.
- Spoon the remaining fresh strawberries (mixed with cornstarch) on top of the cream cheese filling.
- Fold the corners of each pastry square towards the center, pinching them together to secure.
- Brush the top of each Danish with the beaten egg for a golden finish.
- Place the pastries on a baking sheet lined with parchment paper.
- Bake in the preheated oven for 20-25 minutes until golden brown.
- Let them cool slightly before serving.
Notes
Additional serving suggestions: pair with a crisp salad, garlic bread, or roasted seasonal vegetables for balance.
For make-ahead, prep components separately and assemble just before heating to preserve texture.
Taste and adjust with acid (lemon/vinegar) and salt right at the end to wake up flavors.


