Introduction
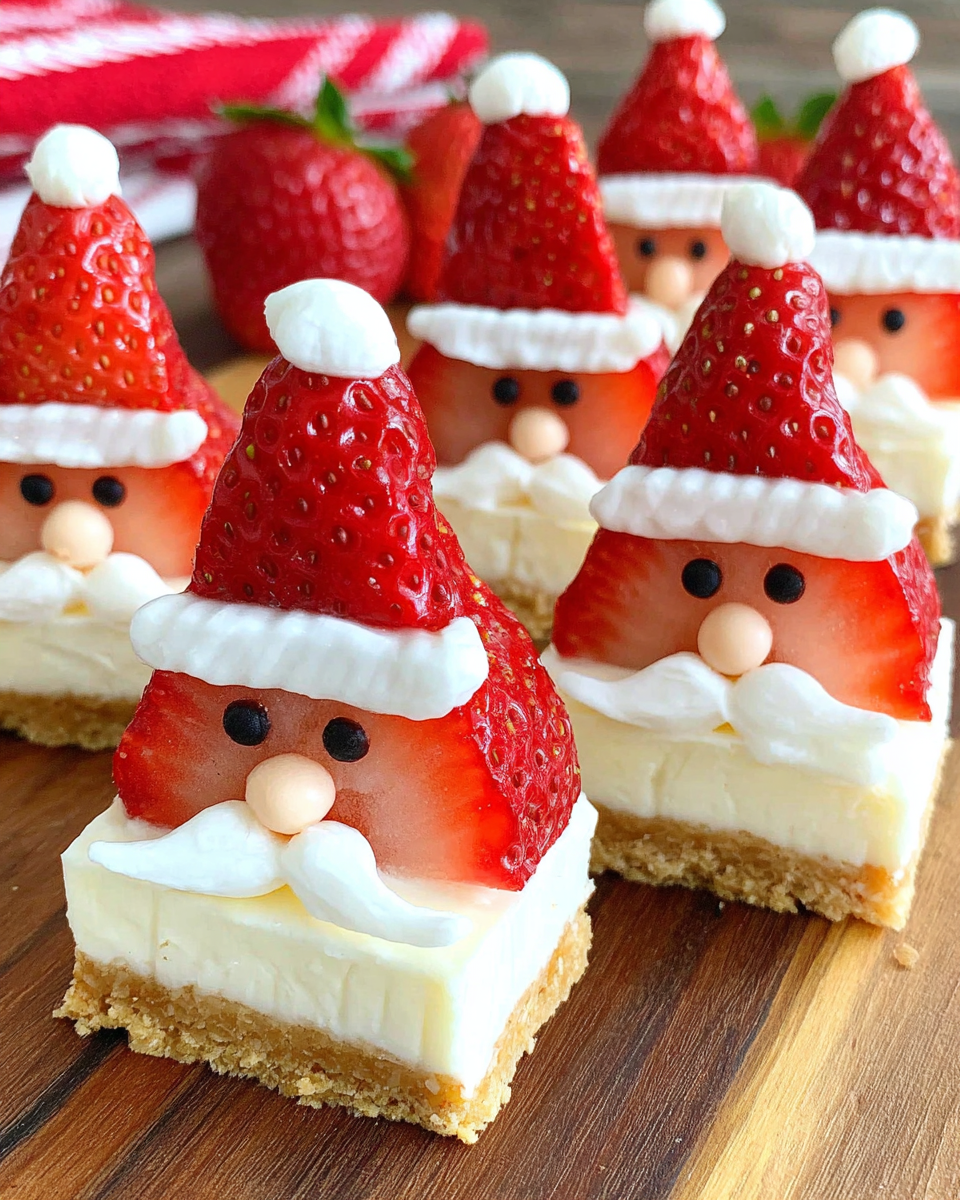
Cheesecake Strawberry Santas are a delightful treat that brings a festive whimsy to any gathering. Perfect for the holiday season, these adorable dessert bites combine creamy cheesecake with luscious strawberries, bringing both flavor and charm to your table. They're easy to make, appealing to both children and adults, and offer the perfect balance of sweetness and tanginess.
This fun and festive dessert takes only a few ingredients and can be a charming centerpiece for your holiday dessert spread. Not only do they look fantastic, but every bite of cheesecake beneath the fresh strawberry cap delivers satisfying creaminess mixed with a fruity burst. Let's dive into how you can craft these delightful treats that are sure to impress your guests.
Ingredients
- 8 oz cream cheese
Cream cheese provides the rich, creamy base for the cheesecake filling, giving it a luscious texture that sets it apart from traditional desserts. Its mild flavor blends beautifully with the sweetness of sugar. - 1/2 cup powdered sugar
Powdered sugar sweetens the cheesecake mixture while also ensuring it stays smooth and creamy. Its fine texture dissolves easily, ensuring a velvety filling without any graininess. - 1 tsp vanilla extract
Vanilla extract adds a warm, aromatic sweetness to the cheesecake filling, enhancing the overall flavor profile. It's a crucial component that rounds out the taste experience. - 1 cup heavy cream
Heavy cream is whipped and folded into the cheesecake mixture, adding volume and a light, airy texture. It also enriches the flavor, making the cheesecakes more indulgent. - Strawberries, about 10-12
Strawberries serve as both the hat and the main fruit component of this treat. Their vivid color and natural sweetness provide a refreshing contrast to the creamy cheesecake. - Mint leaves, for garnish
Mint leaves add a touch of color and freshness, enhancing the visual appeal of the dessert. They offer a subtle herbal note that complements the sweet strawberries perfectly. - Graham cracker crumbs (optional for base)
While optional, graham cracker crumbs can be used to create a tiny base for each cheesecake Santa. Their buttery, slightly sweet flavor adds a nice crunch and balances the softness of the cheesecake.
Directions & Preparation
Step 1: Prepare the cheesecake filling.
In a medium bowl, using an electric mixer, beat the cream cheese until smooth. Gradually add in the powdered sugar and vanilla extract while mixing until fully incorporated. This step is crucial as it ensures that your base is free of lumps and achieves that velvety consistency expected from a cheesecake.
Step 2: Whip the heavy cream.
In another bowl, whip the heavy cream until stiff peaks form. This means lifting the whisk out of the bowl will leave a peak that stands straight up. Whipping the cream adds volume and lightness to the cheesecake mix, creating the fluffy texture in every bite.
Step 3: Fold in the whipped cream.
Gently fold the whipped cream into the cheesecake mixture until fully combined. Use a spatula and a gentle lifting motion to avoid deflating the cream. This folding process is vital; it retains the airiness contributed by the whipped cream, ensuring the cheesecake is light yet rich.
Step 4: Prepare strawberries.
Rinse and pat dry the strawberries, then cut a small slice off the bottom to create a flat base, allowing them to stand upright. This preparation step is important as it helps the strawberries maintain balance when they're presented atop the cheesecake, creating your Santas.
Step 5: Assemble your Cheesecake Strawberry Santas.
Spoon a good amount of the cheesecake filling onto the flat base of each strawberry, using a piping bag or spoon to make it look neat. Assembling them like this not only adds a fun visual element but also ensures that each bite has an even distribution of cheesecake, making them deliciously satisfying.
Step 6: Add the hat and garnish.
Place a trimmed strawberry upside down on top of each filled strawberry to create a 'Santa hat.' Finish with a small mint leaf as the finishing touch. This detail adds a delightful finishing touch, giving your Cheesecake Strawberry Santas personality and character for a festive presentation.
Step 7: Chill before serving.
Refrigerate the assembled Santas for at least 30 minutes before serving. Chilling allows the flavors to meld together, enhances the texture, and makes the cheesecake filling easier to enjoy. This time also helps the strawberries maintain their integrity.

Festive Presentation Options
When creating Cheesecake Strawberry Santas, presentation is key. Consider serving them on a vibrant platter, perhaps garnished with shredded coconut for a snowy effect or pretzel sticks for 'arms.' You can also drizzle some chocolate sauce around the plate for an attractive presentation. The visual appeal enhances the excitement, making them even more inviting for your guests.
Exploring Flavor Variations
While traditional cheesecake filling is delightful, feel free to explore different flavor variations. Incorporating lemon or orange zest can give a zippy freshness, while a hint of almond extract brings a unique dimension. Alternatively, consider adding a layer of chocolate ganache before topping the strawberries for a twist that chocolate lovers will adore. The array of flavors keeps this simple dessert innovative.
Engaging Kids in the Kitchen
Cheesecake Strawberry Santas present an excellent opportunity to involve kids in the kitchen. They’ll enjoy rinsing strawberries, filling them with cheesecake, and decorating their Santas with mint leaves. This interactive activity not only creates fun memories but also teaches them about cooking and creativity in food presentation, making it a family-friendly project.
FAQs
What should I do if the cheesecake filling is too thick?
If your cheesecake filling is too thick, you can fold in a tablespoon or two of heavy cream until you achieve the desired consistency. This will help lighten the mixture without compromising its flavor.
Can I substitute strawberries with another fruit?
Yes, you can use other berries; raspberries or blueberries work beautifully. Their colors and flavors will create similarly charming and delicious results, allowing you to customize based on seasonal or personal preferences.
What if the cheesecake filling seems grainy?
A grainy texture can result from overbeating the cream cheese or using granulated sugar instead of powdered sugar. To correct this, mix on a low speed and ensure the cream cheese is at room temperature before blending.
Is there an alternative to heavy cream for a lighter version?
If you're looking for a lighter option, you can use whipped coconut cream instead of heavy cream, which can add a subtle coconut flavor and a fluffy texture while keeping the Santas dairy-free.
Can I make these Cheesecake Strawberry Santas in advance?
Yes, you can prepare the cheesecake filling a day ahead and assemble the Santas a few hours before serving. However, it's best to add the strawberries just before serving to maintain their freshness.
How can I make sure the strawberries stay upright?
To ensure the strawberries stand upright, trim a small slice off the bottom for a flat base. This simple adjustment provides the stability needed for your Cheesecake Strawberry Santas.
Conclusion
Cheesecake Strawberry Santas are more than just a fun dessert; they bring a festive spirit to any holiday table. With their creamy filling and vibrant strawberry 'hats,' they're sure to be a hit with guests of all ages. Plus, they offer versatility in flavors and presentation, letting your creativity shine.
Serving these delightful treats will not only satisfy your guests' sweet tooth but also evoke the joy of the holiday season in every bite. So, gather your ingredients and spread the festive cheer with these charming Cheesecake Strawberry Santas at your next gathering.
Recipe Card

Flavorful Southwest Beef and Sweet Potato Skillet
Ingredients
- 1 pound ground beef
- 2 medium sweet potatoes diced
- 1 red bell pepper diced
- 1 yellow onion chopped
- 3 cloves garlic minced
- 1 tablespoon chili powder
- 1 teaspoon cumin
- Salt to taste
- Black pepper to taste
- 2 tablespoons olive oil
- 1/4 cup fresh cilantro chopped (optional)
- 1 lime cut into wedges (optional)
Instructions
- Heat olive oil in a large skillet over medium heat.
- Add the chopped onion and sauté until translucent, about 3-4 minutes.
- Stir in the garlic and cook for another 1-2 minutes until fragrant.
- Add the ground beef and cook until browned, breaking it apart as it cooks.
- Stir in the chili powder, cumin, salt, and black pepper, mixing well.
- Add the diced sweet potatoes and red bell pepper, mixing everything together.
- Cover the skillet and cook for about 15-20 minutes, stirring occasionally, until the sweet potatoes are tender.
- Once the sweet potatoes are tender, taste and adjust seasoning if necessary.
- Remove from heat and stir in fresh cilantro if using.
- Serve hot with lime wedges on the side for drizzling over the top.
Notes
Additional serving suggestions: pair with a crisp salad, garlic bread, or roasted seasonal vegetables for balance.
For make-ahead, prep components separately and assemble just before heating to preserve texture.
Taste and adjust with acid (lemon/vinegar) and salt right at the end to wake up flavors.


