Introduction
Strawberry Custard Delight Cake is a testament to the magic that happens when fresh fruit meets creamy custard. This enchanting dessert is not just a treat for the taste buds but also a feast for the eyes, making it perfect for celebrations or a cozy afternoon at home.
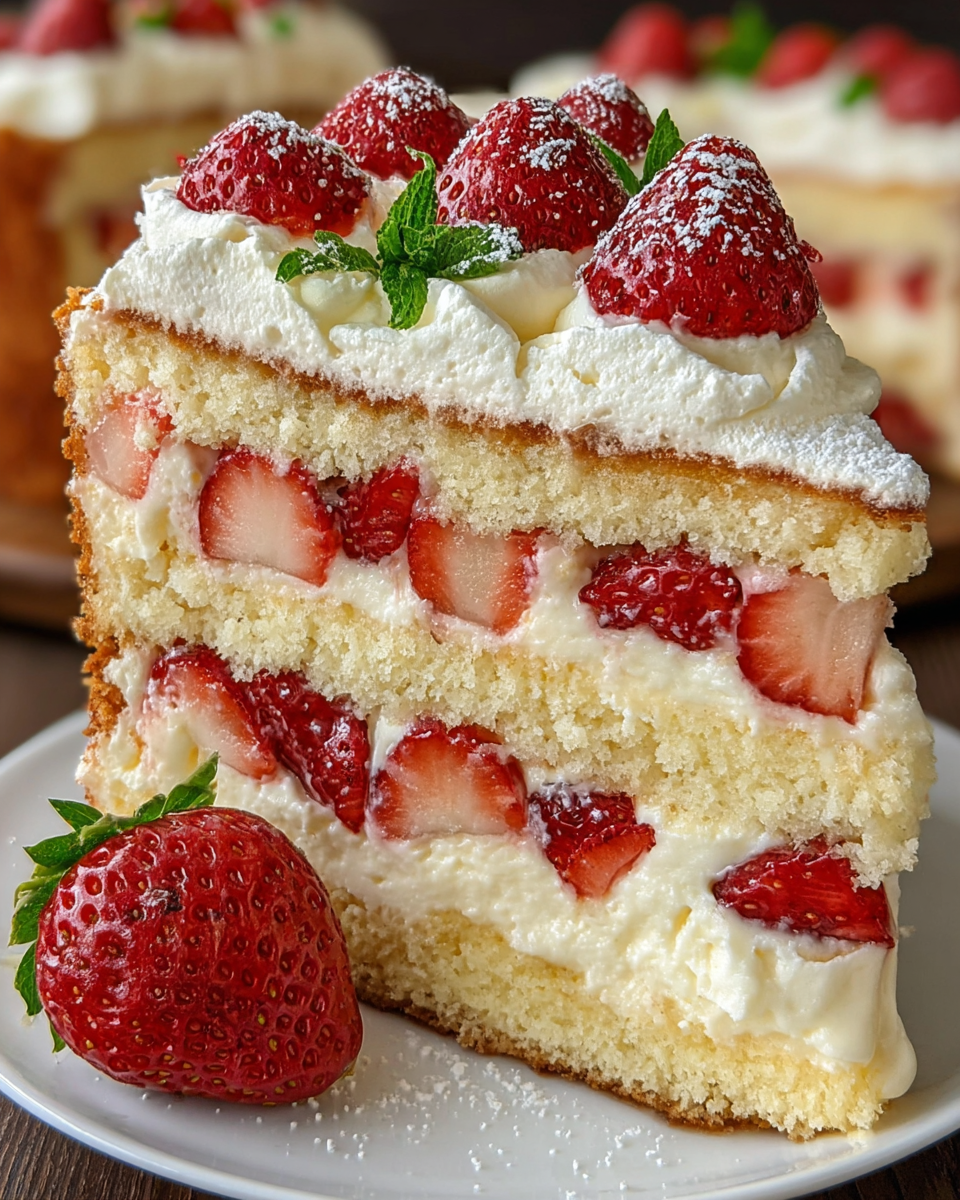
Using simple ingredients, this cake offers layers of flavor that harmonize beautifully. The soft sponge cake pairs perfectly with the rich custard and fresh strawberries, creating a delightful balance that’s sure to impress guests or family alike.
Ingredients
- 2 cups all-purpose flour
All-purpose flour provides the structure of the cake, giving it a light yet firm texture. It’s essential for achieving the right rise and holds together the layers. - 1 cup granulated sugar
Sugar not only sweetens the cake but also enhances its moistness. It helps create a tender crumb and contributes to the cake’s overall flavor. - 1 cup unsalted butter, softened
Butter adds richness and moisture. It creates a tender cake, and when creamed with sugar, it helps incorporate air for a lighter texture. - 4 large eggs
Eggs act as a binding agent, crucial for stabilizing the cake’s structure. They also contribute to moisture and flavor. - 1 cup whole milk
Milk adds moisture and helps achieve a soft, fluffy texture in the cake. It also balances the sweetness and richness from the butter and sugar. - 1 tablespoon baking powder
Baking powder is the leavening agent that helps the cake rise. It ensures a light and airy texture, making the cake more enjoyable to eat. - 1 teaspoon vanilla extract
Vanilla extract enhances the overall flavor profile of the cake, providing a warm and inviting aroma that complements the strawberries. - 2 cups fresh strawberries, sliced
Fresh strawberries add vibrant flavor and natural sweetness to the cake. Their juiciness contrasts beautifully with the creamy custard. - 2 cups prepared custard
The custard provides a creamy, rich layer in the cake that balances the sweetness from the strawberries. It adds depth and a luxurious mouthfeel.
Directions & Preparation
Step 1: Preheat the oven to 350°F (175°C).
Preheating the oven ensures an even baking environment, allowing the cake to rise correctly from the moment it’s placed in. This step is crucial for achieving a light and fluffy texture.
Step 2: Grease and flour two 9-inch round cake pans.
Greasing and flouring the cake pans prevents the cake from sticking. This is essential for an easy release after baking, ensuring your cake retains its shape.
Step 3: In a large bowl, cream together the butter and sugar until light and fluffy.
Creaming the butter and sugar incorporates air into the mixture, which is vital for a light cake. The mixture should be pale and fluffy, a sign that enough air has been whipped in.
Step 4: Add the eggs one at a time, beating well after each addition.
Adding eggs individually allows for better emulsification, creating a smoother batter. This step ensures a uniform texture throughout the cake.
Step 5: Stir in the vanilla extract and mix until combined.
Adding vanilla at this stage infuses the batter with flavor while keeping the texture consistent. It’s essential for enhancing the overall taste.
Step 6: In another bowl, whisk together the flour and baking powder.
Whisking the dry ingredients together ensures an even distribution of the baking powder, which is crucial for even rising throughout the cake.
Step 7: Gradually add the dry mixture to the wet mixture, alternating with the milk.
This method prevents the batter from becoming too thick and helps maintain a smooth consistency. Start and end with the flour mixture for the best results.
Step 8: Pour the batter evenly into the prepared pans.
Dividing the batter evenly ensures both layers bake at the same rate. It helps achieve uniform height, leading to a more professional look.
Step 9: Bake for 25-30 minutes, or until a toothpick comes out clean.
Baking until a toothpick inserted in the center comes out clean indicates the cake is fully cooked. Overbaking can lead to a dry texture, so keep an eye on it.
Step 10: Allow cakes to cool in the pans for 10 minutes, then transfer to a wire rack.
Cooling the cakes in the pans initially helps them set. Transferring to a wire rack allows for proper air circulation, preventing sogginess.
Step 11: Once cooled, place one layer on a serving plate and spread with custard.
Spreading custard on the first layer adds a creamy texture and flavor contrast. A generous layer here will ensure every bite of the cake is delightful.
Step 12: Top with half of the sliced strawberries over the custard.
Layering fresh strawberries on the custard not only enhances flavor but also adds beautiful color to the cake, making it visually appealing.
Step 13: Place the second cake layer on top and repeat the custard and strawberry layers.
Layering the second cake with custard and strawberries creates a beautiful, multi-layered dessert that’s both stunning and delicious.
Step 14: Chill the cake in the refrigerator for at least 30 minutes before serving.
Chilling allows the custard to set properly, making it easier to slice and serve. This step enhances the flavors, making the cake even more enjoyable.
Step 15: Slice and serve, garnished with additional strawberries if desired.
Serving with additional strawberries elevates the presentation and provides an extra burst of freshness. Enjoy this delightful cake with friends and family!

The Perfect Custard Layer
Creating the perfect custard layer is key to achieving the delightful contrast in textures. Make sure your custard is smooth and well-prepared, allowing it to set properly between the cake layers. This invites a luxurious creaminess that complements the sweetness of fresh strawberries beautifully.
Choosing Fresh Strawberries
Selecting ripe strawberries significantly enhances the overall flavor of your cake. Look for firm, bright red berries with glossy skin. This ensures that each bite is bursting with juicy sweetness and provides an appealing visual contrast with the creamy custard.
Presentation Matters
The way you present your Strawberry Custard Delight Cake can elevate your dessert experience. Drizzling some strawberry syrup or a dusting of powdered sugar can add an elegant touch. Remember, a visually appealing cake sets the stage for an equally delightful tasting experience.
FAQs
What if my custard is too runny?
If your custard seems too runny, it likely needs more time to cook to allow it to thicken. Ensure you’re using enough cornstarch or flour if modifying the recipe.
Can I use other fruits instead of strawberries?
Yes, you can use other fruits like blueberries or raspberries. Just ensure that the fruit complements the flavor of the custard.
What do I do if my cake layers are uneven?
If the layers are uneven, you can trim the tops to create a level surface. It’s a common issue and will not affect the flavor.
What if my cake is too dense?
A dense cake may indicate overmixing or too much flour. To prevent this next time, mix just until combined and measure flour accurately.
Is it okay to substitute ingredients in this recipe?
You can make substitutions, such as using almond milk instead of whole milk, but note that it may affect the flavor and texture.
What should I do if my strawberries leak juice all over the cake?
If your strawberries release too much juice, place them on paper towels before layering to absorb excess moisture.
Conclusion
The Strawberry Custard Delight Cake is a delicious blend of flavors and textures that celebrates fresh fruit in a classic format. Each bite promises a joyful combination of sweetness and creaminess that will leave everyone wanting more.
Whether it’s for a special occasion or a simple dessert to brighten up your day, this cake is sure to become a favorite in your kitchen. So gather your ingredients, embrace the process, and enjoy the delightful results!
Recipe Card

Indulgent Cheesy Garlic Scalloped Potatoes Recipe
Ingredients
- 4 large russet potatoes sliced
- 2 cups heavy cream
- 1 cup shredded sharp cheddar cheese
- 4 cloves of garlic minced
- 1 teaspoon salt
- 1/2 teaspoon black pepper
- 1 tablespoon fresh parsley chopped (optional garnish)
Instructions
- Preheat the oven to 375°F (190°C).
- Prepare the potatoes by washing, peeling, and slicing them thinly.
- In a saucepan, combine heavy cream, minced garlic, salt, and black pepper. Heat gently until just warmed.
- Layer half of the sliced potatoes in a greased baking dish. Pour half of the cream mixture over the potatoes, and sprinkle half of the cheese on top.
- Repeat with the remaining potatoes, cream, and cheese to create a second layer.
- Cover the baking dish with aluminum foil and bake for 45 minutes.
- Remove the foil and bake for an additional 30 minutes, or until the top is golden and bubbly.
- Let the dish cool for 10 minutes before serving, and garnish with fresh parsley if desired.
Notes
Additional serving suggestions: pair with a crisp salad, garlic bread, or roasted seasonal vegetables for balance.
For make-ahead, prep components separately and assemble just before heating to preserve texture.
Taste and adjust with acid (lemon/vinegar) and salt right at the end to wake up flavors.


