Introduction
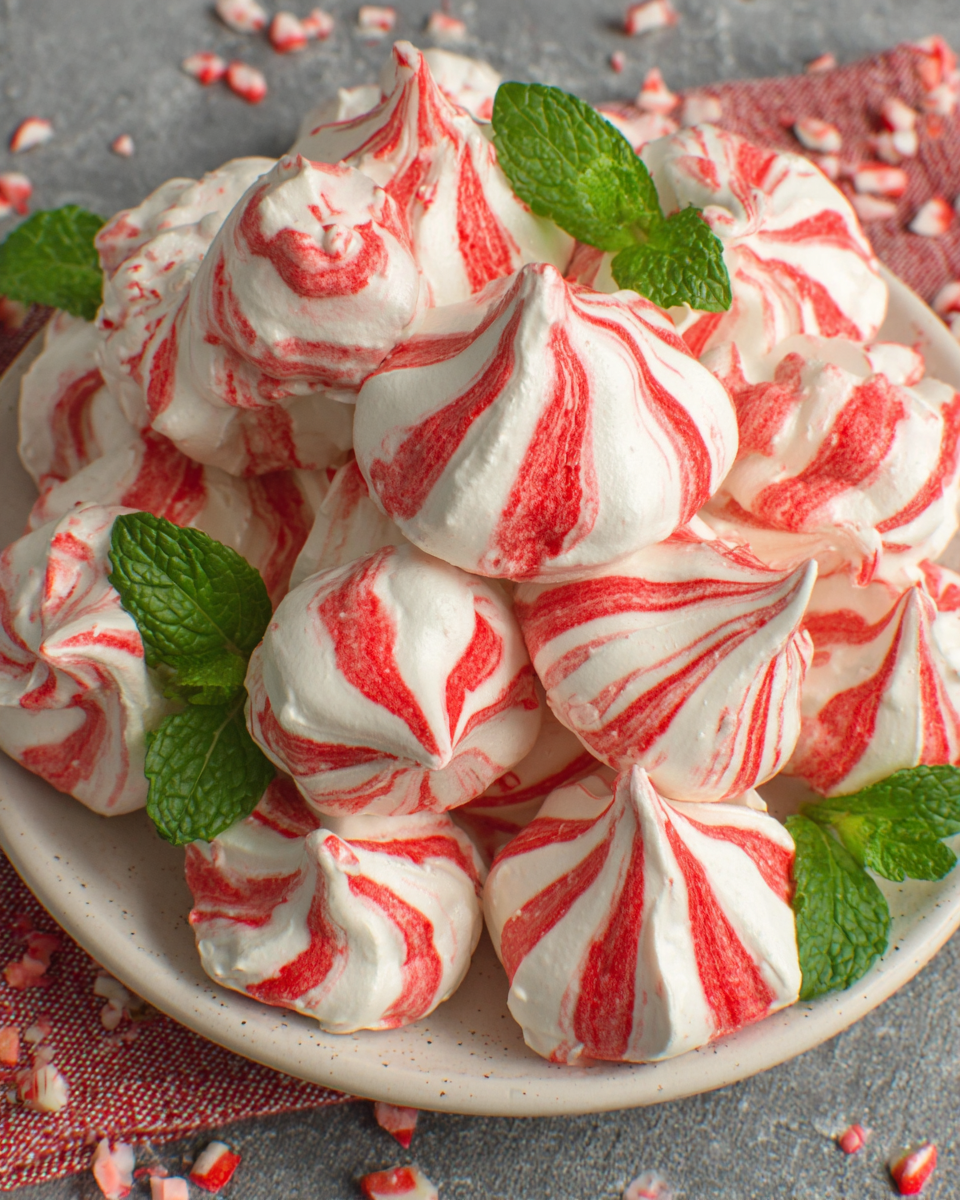
As the holiday season approaches, the allure of sweet treats fills the air. Peppermint meringues stand out as a light, airy delicacy that perfectly embodies the festive spirit. Their delightful combination of crisp exteriors and melt-in-your-mouth insides makes them a favorite among both young and old.
These little bites are not only visually appealing but are also incredibly versatile. You can serve them as holiday treats or use them as decorative elements in desserts. With a gentle hint of peppermint, they capture the essence of Christmas in each delightful morsel.
Ingredients
- 4 large egg whites
Egg whites are the main ingredient in meringues, providing structure and volume. When whipped, they create stable peaks that give the meringues their characteristic lightness and texture. - 1 cup granulated sugar
Granulated sugar sweetens the meringues and helps stabilize the egg whites. As the sugar dissolves into the egg whites during whipping, it forms a glossy texture that holds the air, creating the light and fluffy consistency we desire. - 1/2 teaspoon cream of tartar
Cream of tartar is an acid that helps stabilize the whipped egg whites. It enhances the volume and firmness of the meringue, ensuring that it maintains its shape during baking. - 1/2 teaspoon pure peppermint extract
Peppermint extract infuses the meringues with refreshing flavor. It’s essential for evoking holiday spirit and complements the sweetness of the sugar very well. - 1 to 2 tablespoons crushed candy canes
Crushed candy canes not only serve as a decorative topping but also add a delightful crunch and additional peppermint flavor, elevating the festive element of the meringues. - Pinch of salt
A pinch of salt enhances the overall flavor of the meringues, balancing the sweetness and elevating the taste profile.
Directions & Preparation
Step 1: Preheat the oven to 200°F (93°C).
Preheating the oven is crucial for meringues to bake evenly and thoroughly. Low temperatures allow the meringues to dry out rather than bake quickly, which helps prevent a chewy texture and ensures a crisp finish.
Step 2: In a clean mixing bowl, whisk the egg whites until foamy.
Whisking the egg whites until foamy is the first step in creating a stable meringue. At this point, they should be light and airy, which means you're ready to start incorporating sugar for stabilization and volume.
Step 3: Add cream of tartar and salt, continue whisking until soft peaks form.
Introducing cream of tartar and salt at this stage helps the egg whites achieve the right texture. Soft peaks will start to form, which means that when you lift the whisk, the peaks will gently fold over rather than standing straight, indicating you're on the right track.
Step 4: Gradually add granulated sugar while whisking to stiff peaks.
Adding sugar gradually is key to creating a sturdy meringue. Stiff peaks signify that the sugar has completely dissolved and the mixture can hold its shape during baking. The glossy finish indicates that the meringue is ready for the next steps.
Step 5: Mix in peppermint extract gently.
Incorporating the peppermint extract gently ensures that you don’t deflate the meringue. The right amount of best quality extract enhances flavor without overpowering the delicate structure you've created.
Step 6: Scoop the meringue mixture onto a lined baking sheet.
Scooping the meringue onto the baking sheet allows for individual portions to form. Use a piping bag or spoon, depending on your preferred shape, while maintaining even spacing for air circulation during baking.
Step 7: Sprinkle crushed candy canes on top before baking.
Sprinkling crushed candy canes offers a delightful visual appeal as well as a textural contrast. The crunch complements the smooth meringue, creating a multi-dimensional experience that’s festive and fun.
Step 8: Bake for 1.5 to 2 hours until dry and crisp.
Baking at a low temperature for an extended period is essential for achieving the right texture. The goal is to dry the meringues thoroughly without browning them. They should easily lift off the parchment while being light and crunching in your mouth.
Step 9: Turn off the oven and allow meringues to cool completely inside.
Cooling your meringues in the oven prevents them from cracking due to sudden temperature changes. This step allows the inside to maintain that melt-in-your-mouth quality, while the outside remains crisp.
Step 10: Store in an airtight container until serving.
Storing your meringues in an airtight container helps them retain their crispness. Ensure they are completely cooled before sealing to prevent moisture from compromising their texture.

Choosing the Right Peppermint Extract
When selecting peppermint extract for meringues, prioritize high-quality, pure extracts. Imitation extracts can contain artificial flavors that may detract from the natural sweetness and freshness of the meringue. A more concentrated extract will give a stronger peppermint flavor, allowing the festive spirit to shine through in every bite.
Making Meringue Masterpieces
Once you master the basic meringue technique, consider experimenting with different flavors or colors to create a variety of festive shapes and sizes. A swirl of food coloring can add a holiday touch, while varying flavors like vanilla or almond can create a fun twist. These variations not only bring excitement to your dessert table but can personalize your meringue experience.
Serving Suggestions for Your Meringues
Peppermint meringues can shine on their own, but they can also elevate other desserts. Consider crumbling them over holiday parfaits, or serving alongside rich chocolate desserts to balance the flavors. Pairing them with warm beverages like cocoa or sipping on festive cocktails can also enhance their refreshing mint essence.
FAQs
What if my meringue mixture is too runny?
If your meringue is too runny, it might be due to insufficient whisking or the presence of fat in the mixing bowl. Ensure that your bowl is entirely clean and whisk the egg whites until stiff peaks form before adding any sugar.
Can I make meringues without cream of tartar?
Yes, if you don’t have cream of tartar, you can substitute it with lemon juice or vinegar in equal amounts. These acids work similarly to stabilize the egg whites.
Why did my meringues crack during baking?
Cracking may occur if the oven temperature is too high. Always bake at low temperatures to allow them to dry out slowly and evenly, and ensure they are cool before removing them from the oven.
How can I make my meringues more colorful?
To add color, gently fold in gel food coloring after the meringue has reached stiff peaks. Be cautious not to deflate the meringue by mixing too vigorously.
Are the meringues supposed to be chewy on the inside?
No, meringues should be dry and crisp throughout. If they are chewy, they likely need more time in the oven at low temperatures to fully dry out.
Can I double the recipe for a larger batch?
Absolutely! Just ensure you have a large enough mixing bowl to accommodate the increased volume, and take care to whip the egg whites adequately to ensure they can hold the extra sugar.
Conclusion
Peppermint meringues are a delightful addition to any holiday celebration. Their light, airy texture paired with refreshing flavor makes them an elegant treat that guests love.
Whether enjoying them fresh from the oven or presenting them as a fancy dessert element, these meringues are sure to be a showstopper on your festive table. Embrace the spirit of the season with this simple yet charming recipe.
Recipe Card

Genius Chicken Caesar Salad Wrap for Home Cooks
Ingredients
- 2 cups cooked chicken breast shredded
- 4 large romaine lettuce leaves
- 1/2 cup Caesar dressing
- 1/3 cup grated Parmesan cheese
- 1/2 cup croutons roughly crushed
- 4 large flour tortillas
- Salt and pepper to taste
Instructions
- Prepare the Chicken
- Wash and Dry the Romaine
- Mix the Ingredients
- Prepare the Tortillas
- Assemble the Wraps
- Secure and Slice
- Serve Immediately
Notes
Additional serving suggestions: pair with a crisp salad, garlic bread, or roasted seasonal vegetables for balance.
For make-ahead, prep components separately and assemble just before heating to preserve texture.
Taste and adjust with acid (lemon/vinegar) and salt right at the end to wake up flavors.


