Introduction
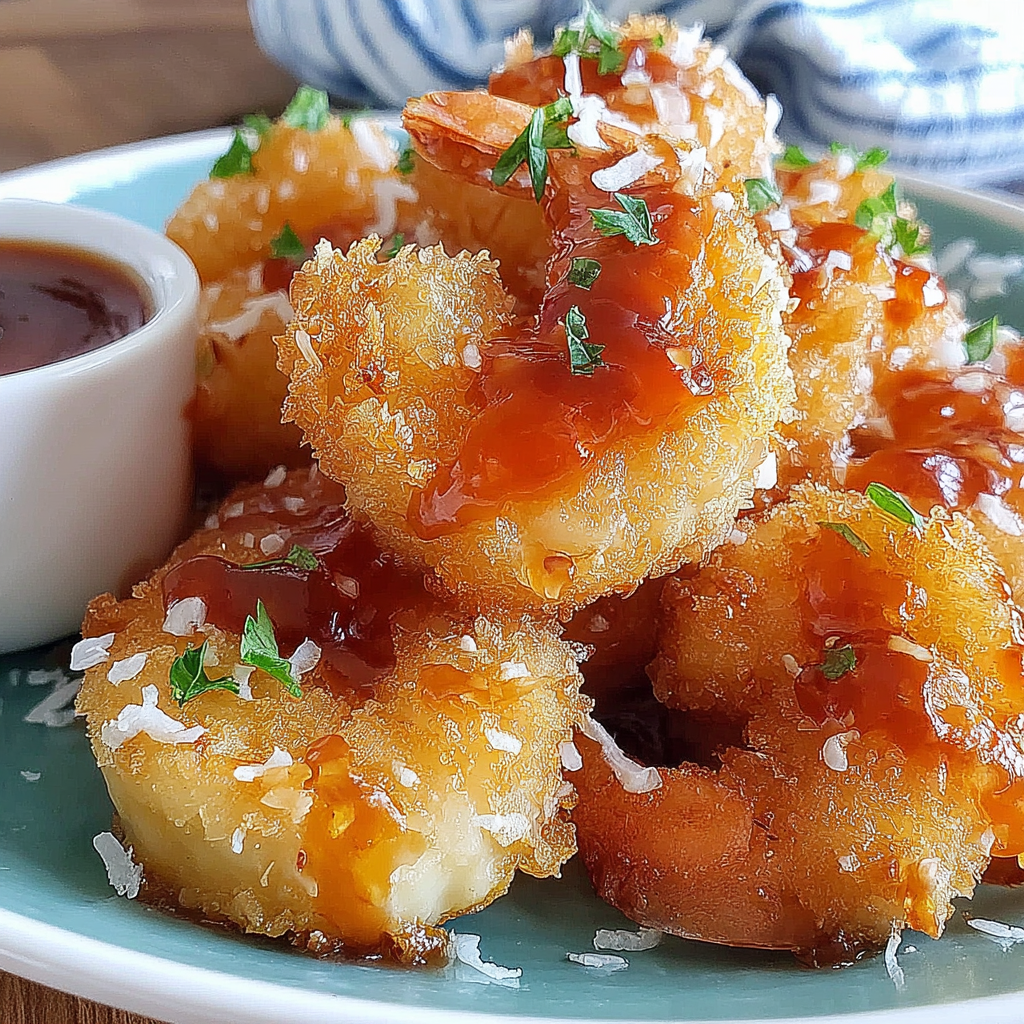
Coconut shrimp is a flavorful dish that brings the taste of the tropics to your kitchen. Crispy, golden-brown shrimp coated in a luscious layer of shredded coconut makes for an irresistible appetizer or main course. Paired with a sweet chili sauce, the combination is both sweet and savory, tantalizing your taste buds with each bite.
Making coconut shrimp at home is easier than you might think. With just a few ingredients and some patience, you can achieve that crunchy texture and delicious flavor typical of restaurant fare. The contrast between the crispy exterior and the tender shrimp inside creates an enjoyable culinary experience.
Whether you're planning a cozy dinner or a festive gathering, coconut shrimp is sure to impress. Serve it as an appetizer or alongside a salad for a light meal. With its appealing presentation and delightful taste, this dish is bound to become a favorite in your home.
Ingredients
- 1 pound large shrimp, peeled and deveined
These shrimp serve as the star of the dish, with their sweetness complementing the coconut flavor perfectly. For the best texture, use large or jumbo shrimp, which hold up well during frying. - 1 cup shredded coconut
Shredded coconut adds a tropical flair and nutty sweetness to the shrimp. It’s important to get unsweetened coconut for a robust, balanced flavor that pairs well with the sweet chili sauce. - 1 cup all-purpose flour
Flour helps create a base layer that adheres to the shrimp. It also contributes to the crispy texture when fried, giving the shrimp a delightful crunch. - 2 large eggs
Eggs act as a binding agent, helping the coconut adhere to the shrimp. They also add richness and moisture, enhancing the overall flavor profile. - 1 teaspoon salt
Salt enhances the flavor of the shrimp, balancing the sweetness of the coconut and the sauce. It’s essential to season the flour for a well-rounded taste. - 1 teaspoon black pepper
Black pepper adds a hint of spiciness which contrasts nicely with the sweetness. It brings depth to the flavor, making the dish more complex. - Vegetable oil, for frying
Oil is necessary for frying the shrimp to achieve that perfect golden color and crunch. A neutral oil with a high smoke point, such as canola or vegetable oil, is best. - 1/2 cup sweet chili sauce
Sweet chili sauce provides a tangy and sweet contrast to the crispy coconut shrimp. It’s the ideal dipping sauce, adding an extra layer of flavor that elevates the dish.
Directions & Preparation
Step 1: Prepare the shrimp.
Start by rinsing the shrimp under cold water and patting them dry with paper towels. This step is essential to remove excess moisture, which can prevent the breading from adhering properly and can result in soggy shrimp when frying.
Step 2: Set up a breading station.
Arrange three shallow dishes: one for flour mixed with salt and pepper, another for beaten eggs, and the third for shredded coconut. This station is crucial for an efficient breading process, allowing you to coat the shrimp evenly and quickly.
Step 3: Bread the shrimp.
Dip each shrimp first into the flour, ensuring it is fully coated. Shake off any excess, then transfer it to the egg bath, and finally roll it in the shredded coconut until well coated. This multi-step coating creates a perfect crunchy crust that fries up beautifully.
Step 4: Heat the oil.
In a deep pan or skillet, pour enough oil to cover the bottom by about half an inch, and heat over medium-high heat. Testing the oil temperature is essential; you can drop a small piece of bread into the oil—if it sizzles and bubbles, the oil is ready for frying.
Step 5: Fry the shrimp.
Carefully add the breaded shrimp to the hot oil in batches, ensuring not to overcrowd the pan. Fry for about 2-3 minutes on each side, or until golden brown. This step is vital for achieving that crispy exterior without overcooking the shrimp inside.
Step 6: Drain the shrimp.
Once fried, place the shrimp on a plate lined with paper towels to absorb excess oil. This helps maintain the crispiness of the shrimp and prevents them from becoming greasy.
Step 7: Prepare to serve.
Arrange the crispy coconut shrimp on a serving platter. Drizzle or serve with sweet chili sauce for dipping. Presentation is important, so consider garnishing with fresh herbs or lime wedges for a burst of freshness that complements the dish.

The Art of Deep Frying
Deep frying, often perceived as daunting, is an essential technique that can yield professional results at home. Achieving the right oil temperature is crucial, as it impacts cooking time and texture. A thermometer can be your best friend here, ensuring the oil is hot enough to create that desirable crunch without soaking the shrimp in grease.
Sweet Chili Sauce: A Perfect Companion
The sweetness and slight heat of sweet chili sauce makes it the perfect partner for coconut shrimp. You can buy it ready-made or, for an adventurous twist, try making your own at home using chili peppers, sugar, vinegar, and garlic. This sauce elevates the dish, providing a bright balance to the rich coconut flavors.
Variations to Explore
Coconut shrimp can easily be adjusted to fit various flavor profiles. Consider adding spices like paprika or cayenne pepper to your flour for a kick, or even coconut aminos for a savory flavor. You could also experiment with different coatings, like panko breadcrumbs, to give an interesting texture while still keeping that coconut essence.
FAQs
What if the breading falls off during frying?
This can happen if the shrimp are too wet or if they’re not coated properly. Ensure the shrimp are well-dried before breading, and press down gently to adhere the coconut firmly to the shrimp.
How can I ensure my coconut shrimp isn't soggy?
Make sure not to overcrowd the pan while frying, as this can lower the oil temperature. Also, draining the shrimp on paper towels immediately after frying will help remove excess oil.
Can I use frozen shrimp for this recipe?
Yes, but be sure to thaw them completely and pat them dry before proceeding with the recipe. Frozen shrimp can retain water which will affect the breading.
What if my sweet chili sauce is too thick?
If your sweet chili sauce is too thick, you can thin it down with a little bit of warm water or vinegar until it reaches your desired consistency without losing flavor.
Can I add spices to my coconut coating?
Absolutely! Feel free to mix in spices like garlic powder, paprika, or cayenne pepper to the shredded coconut for added flavor complexity.
Are there alternatives to sweet chili sauce?
You can experiment with other dipping sauces such as a mango salsa or a spicy aioli. Each will provide a different flavor profile that can complement the coconut shrimp.
Conclusion
Coconut shrimp with sweet chili sauce is a delightful dish that perfectly balances flavors and textures, making it an ideal choice for any occasion. With a little preparation and careful frying, you can achieve a restaurant-quality meal at home.
This dish not only satisfies cravings but also brings a touch of tropical flair to your dining table. Whether you serve it as a starter or a main dish, it’s guaranteed to be a hit with family and friends alike.
Recipe Card

Delightful Coconut Shrimp with Sweet Chili Sauce
Ingredients
- 1 pound large shrimp peeled and deveined
- 1 cup shredded coconut
- 1 cup all-purpose flour
- 2 large eggs
- 1 teaspoon salt
- 1 teaspoon black pepper
- Vegetable oil for frying
- 1/2 cup sweet chili sauce
Instructions
- Prepare the shrimp.
- Set up a breading station.
- Bread the shrimp.
- Heat the oil.
- Fry the shrimp.
- Drain the shrimp.
- Prepare to serve.
Notes
Additional serving suggestions: pair with a crisp salad, garlic bread, or roasted seasonal vegetables for balance.
For make-ahead, prep components separately and assemble just before heating to preserve texture.
Taste and adjust with acid (lemon/vinegar) and salt right at the end to wake up flavors.


