Introduction
There's something truly magical about homemade bread, especially when it comes to the aroma of freshly baked Swirled Garlic Herb & Cheese Bread. The combination of savory garlic, vibrant herbs, and gooey cheese creates an unforgettable flavor experience that elevates the humble loaf to a star of any meal.
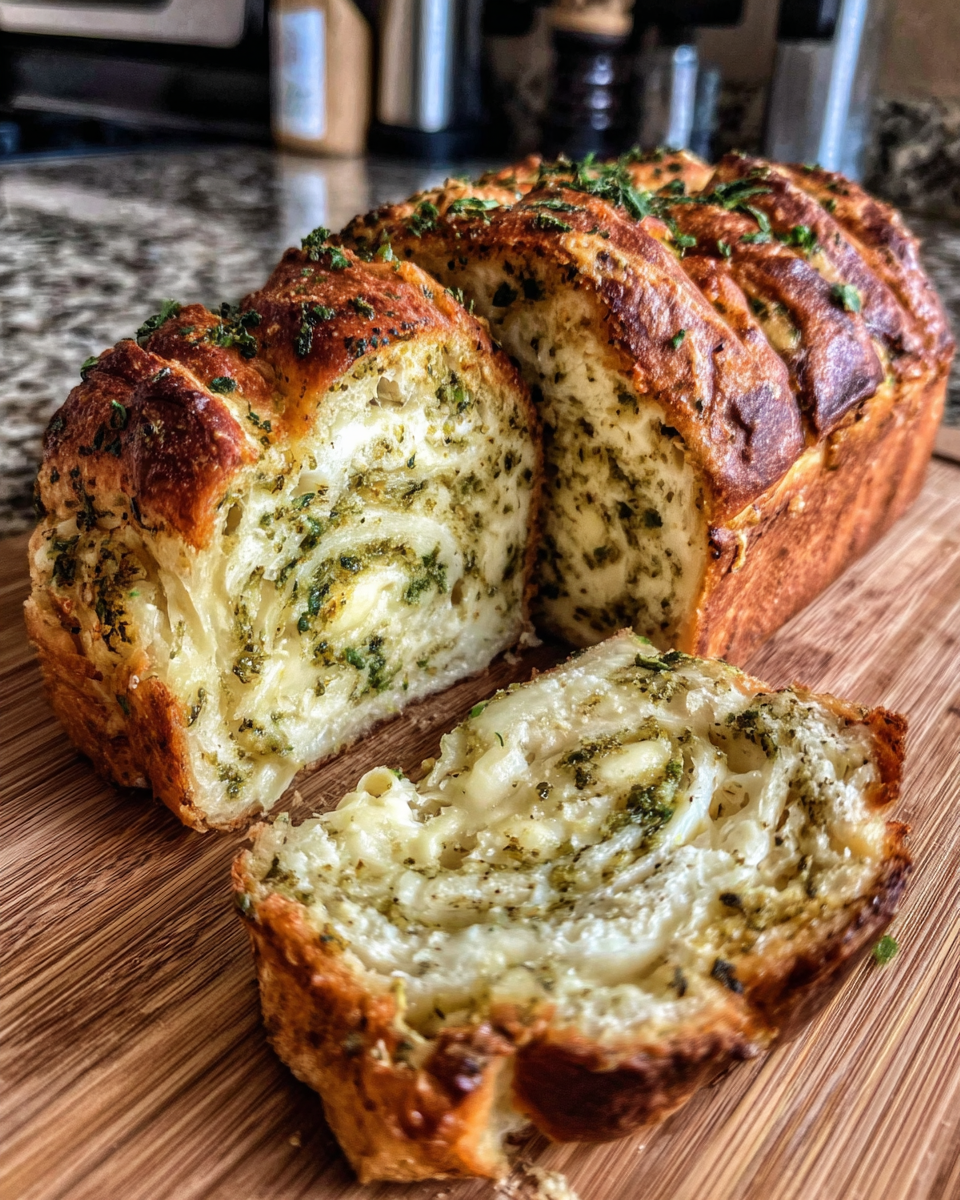
Whether enjoyed as a side dish, a standalone snack, or a centerpiece for a delicious brunch, this bread is all about comfort and indulgence. Its beautifully swirled appearance invites you to take a slice, and the first bite reveals the delightful layers of flavor that will have you coming back for more.
Ingredients
- 4 cups all-purpose flour
The foundation of our bread, all-purpose flour provides the necessary structure and texture. Its high protein content forms gluten, which gives the bread its chewy qualities and helps it rise. - 1 package (2 1/4 tsp) active dry yeast
Yeast is the magic ingredient that causes the bread to rise. It ferments the sugars in the dough, producing carbon dioxide and alcohol, leading to a light and airy texture. - 1 1/2 cups warm water
Warm water activates the yeast, providing the optimal environment for fermentation. It helps hydrate the flour, allowing for proper gluten development. - 2 tbsp sugar
Sugar acts as food for the yeast and boosts the initial rise of the dough. It also contributes to a slight sweetness that balances the savory elements of the bread. - 2 tsp salt
Salt enhances the overall flavor of the bread and also strengthens the gluten structure. It's essential for balancing the flavors in the dough. - 1/2 cup unsalted butter, melted
Butter adds richness and flavor to the bread. It also helps keep the bread moist and tender by shortening the gluten strands. - 4 cloves garlic, minced
Garlic infuses the bread with its aromatic, savory character. It brings depth of flavor and pairs wonderfully with the herbs and cheese. - 1/4 cup fresh parsley, chopped
Parsley adds a fresh, vibrant flavor and enhances the visual appeal of the bread. Fresh herbs contribute bright notes that balance the richness of the cheese. - 1/4 cup fresh basil, chopped
Basil provides a lovely fragrance and a slightly sweet, peppery taste. This classic herb complements the flavors of garlic and cheese beautifully. - 1 1/2 cups shredded cheese (mozzarella and cheddar blend)
Cheese adds indulgent creaminess and flavor complexity. The meltiness of mozzarella combined with the sharpness of cheddar creates a delightful cheese pull in every bite.
Directions & Preparation
Step 1: Activate the yeast
In a large mixing bowl, combine warm water, sugar, and active dry yeast. Let it sit for about 5-10 minutes until the mixture becomes frothy. This step is crucial as it ensures the yeast is alive and active, which is essential for the dough to rise properly.
Step 2: Mix in the dry ingredients
Add the flour and salt to the yeast mixture, stirring until a shaggy dough forms. This process incorporates the yeast and helps develop the gluten structure, which is key to a good texture in the finished bread.
Step 3: Add the melted butter
Pour in the melted butter and mix until fully incorporated. Butter enriches the dough, helping to create a tender crumb and enhancing the flavor. Take care not to add too much hot butter, as it might kill the yeast.
Step 4: Knead the dough
Transfer the dough to a floured surface and knead for about 8-10 minutes until smooth and elastic. Kneading develops the gluten, giving the bread structure and chewiness. You’ll know it's ready when the dough springs back when pressed.
Step 5: Let the dough rise
Place the kneaded dough in a greased bowl, cover it with a damp cloth, and let it rise in a warm place for about 1-2 hours, or until doubled in size. This fermentation step is where the yeast works its magic, creating flavor and volume.
Step 6: Prepare the garlic herb mixture
In a small bowl, mix together minced garlic, parsley, basil, and shredded cheese. This mixture will be swirled into the dough, providing bursts of flavor and melty texture throughout the bread.
Step 7: Shape the dough
Once risen, punch down the dough to release air, then roll it out into a rectangle on a floured surface. Shaping creates surface tension in the dough, which makes for a better rise in the oven.
Step 8: Spread the filling
Evenly spread the garlic herb and cheese mixture over the rolled-out dough. This will create the beautiful swirls in the bread, and ensure each slice is packed with flavor.
Step 9: Roll and form the loaf
Starting from one end, roll the dough tightly into a log. Pinch the seams to seal it. Turning the log into a spiral creates the desired swirls, and sealing maintains the shape during baking.
Step 10: Second rise
Place the shaped loaf into a greased loaf pan, cover it, and let it rise for another 30-45 minutes. This second rise is essential for a light and fluffy texture, as the dough continues to develop and expand.
Step 11: Preheat the oven
While the dough is rising, preheat your oven to 375°F (190°C). A hot oven ensures the bread begins cooking immediately, providing a good oven spring that creates the ideal texture.
Step 12: Bake the bread
Bake the loaf in the preheated oven for 25-30 minutes or until golden brown. The heat allows the crust to form, while the inside remains soft and fluffy. A well-baked loaf will sound hollow when tapped.
Step 13: Cool and serve
Once baked, let the loaf cool in the pan for a few minutes before transferring it to a wire rack. This cooling phase ensures the crust remains crisp while preventing the inside from becoming overly dense. Serve warm for the best flavor experience.

Understanding Dough Fermentation
Fermentation is a critical aspect of bread-making that greatly influences both flavor and texture. During this process, yeast consumes the sugars in the dough, producing gases that allow the bread to rise. The longer the fermentation, the more complex the flavor becomes, as the yeast creates additional compounds that enhance the taste profile of the bread.
Mastering the Art of Kneading
Kneading the dough is where technique meets texture. This process aligns the gluten strands, resulting in a strong and elastic dough. By kneading thoroughly, you cultivate the perfect structure that supports the air pockets created during rising, leading to a light and airy loaf. Pay attention to the dough's feel; it should be smooth and slightly tacky but not overly sticky.
Creating Flavorful Swirls
The beauty of Swirled Garlic Herb & Cheese Bread lies not just in its appearance but in the layers of flavor packed within. By evenly distributing the garlic herb and cheese mixture, each slice reveals a delightful blend of savory notes that enhances the overall eating experience. Experimenting with different herbs or cheeses can open up endless flavor possibilities, making this loaf a versatile addition to any meal.
FAQs
What can I do if my dough is too sticky?
If your dough is too sticky, try adding a bit more flour, one tablespoon at a time, until it reaches the desired consistency. Be careful not to add too much, as this can dry out the bread.
Can I substitute other cheeses for the filling?
Absolutely! You can use a mix of your favorite cheeses. For instance, adding a sharp provolone or gooey gouda can create wonderful variations in flavor and texture.
What if my bread doesn’t rise well?
If your bread doesn't rise, it could be due to inactive yeast. Always ensure your yeast is fresh and that the water temperature is ideal for activation—too hot can kill the yeast, while too cold won't activate it properly.
How can I tell when the bread is done baking?
The bread is done when it's golden brown on top and sounds hollow when tapped on the bottom. You can also use a thermometer; the internal temperature should reach about 190°F (88°C).
What if I want to make smaller loaves?
You can easily divide the dough into smaller portions before rolling and shaping. Adjust the baking time accordingly, as smaller loaves may bake faster.
How do I prevent the filling from leaking out during baking?
Make sure to seal the edges thoroughly when rolling the dough, and avoid overfilling. A well-sealed log helps maintain the integrity of the bread as it rises.
Conclusion
Swirled Garlic Herb & Cheese Bread is not only a delight to the palate but also a feast for the eyes. This enticing loaf, with its striking swirls and rich flavor, can transform any meal into a special occasion.
By following these simple steps, you can create a warm, comforting bread that fills your kitchen with delightful aromas. Enjoy this bread with a variety of dishes or simply on its own, dipped in olive oil or spread with butter.
Recipe Card

Delicious Pesto Shrimp Linguine for Perfect Dinners
Ingredients
- 8 oz linguine pasta
- 1 lb shrimp peeled and deveined
- 1 cup fresh basil pesto
- 2 tablespoons olive oil
- 3 cloves garlic minced
- 1/2 teaspoon red pepper flakes
- Salt and pepper to taste
- 1/4 cup freshly grated Parmesan cheese
- Fresh basil leaves for garnish
Instructions
- Cook the linguine pasta according to package instructions.
- Heat olive oil in a large skillet over medium heat.
- Add minced garlic and red pepper flakes to the skillet, sautéing until fragrant.
- Add the shrimp to the skillet, seasoning with salt and pepper.
- Toss in the cooked linguine and pesto, mixing well.
- Serve hot, garnished with Parmesan cheese and fresh basil.
Notes
Additional serving suggestions: pair with a crisp salad, garlic bread, or roasted seasonal vegetables for balance.
For make-ahead, prep components separately and assemble just before heating to preserve texture.
Taste and adjust with acid (lemon/vinegar) and salt right at the end to wake up flavors.


