Introduction
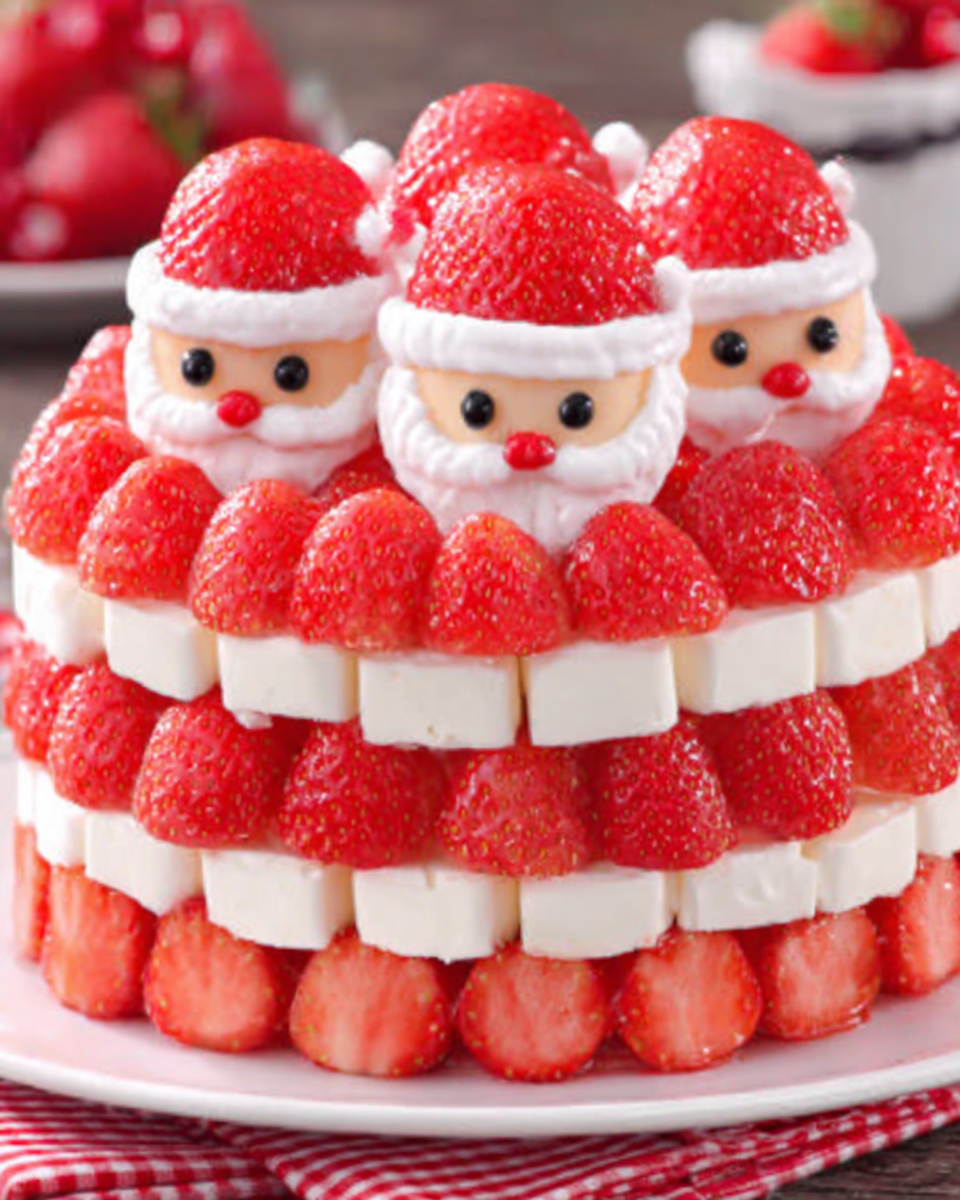
As the holiday season approaches, bringing cheer and joy to your gatherings, these Cheesecake Strawberry Santas become a delightful centerpiece on any dessert table. They not only look charming but also taste indulgent, featuring a creamy cheesecake filling that perfectly complements fresh strawberries.
Creating these adorable treats requires simple ingredients and a little creativity. This festive recipe is perfect for parties or as a fun baking activity with family. With vibrant colors and a playful presentation, Cheesecake Strawberry Santas are sure to impress guests of all ages.
Ingredients
- 12 medium strawberries
The strawberries serve as the base of the Santa figure, providing sweetness, freshness, and a bright pop of color that enhances the visual appeal of the dessert. - 1 cup cream cheese, softened
Cream cheese is the primary ingredient in the cheesecake filling, contributing a rich and creamy texture that anchors the overall dessert. - 1/2 cup powdered sugar
Powdered sugar sweetens the cheesecake filling without adding graininess, helping to create a smooth, velvety texture that melds beautifully with the strawberries. - 1 cup whipped cream
Whipped cream adds lightness and airiness to the cheesecake filling, balancing its richness and giving it a luscious mouthfeel. - 1/2 teaspoon vanilla extract
Vanilla extract enhances the flavor profile of the cheesecake, imparting a warm, aromatic note that complements the sweetness of the strawberries. - Mini chocolate chips (for eyes)
The mini chocolate chips not only add a touch of whimsy to the Santas but also introduce a slight chocolate flavor that pairs well with the creamy cheesecake. - Additional strawberries (for hats)
Extra strawberries are needed to create the iconic Santa hat, showcasing the fun and festive nature of this dessert while providing extra fruity flavor.
Directions & Preparation
Step 1: Prepare the strawberries by washing and hulling them.
Rinse the strawberries thoroughly and remove the green tops to create a flat base for sitting. Hulling the strawberries means removing the core, allowing for better filling and a more appealing Santa design. Ensure to select strawberries that are firm and evenly shaped for a more balanced presentation.
Step 2: In a mixing bowl, beat the softened cream cheese and powdered sugar until smooth.
Mixing the cream cheese and powdered sugar creates a uniform, creamy filling that will be easy to pipe into your strawberries. Be sure to use room temperature cream cheese to avoid lumps and achieve a silky consistency. A smooth texture is crucial for a delightful cheesecake experience.
Step 3: Gently fold in the whipped cream and vanilla extract into the cream cheese mixture.
Folding in the whipped cream gently blends air into the mixture, ensuring it remains light and fluffy. This step is vital for achieving the desired texture. Incorporating the vanilla at this stage enhances the overall flavor, creating a delightful contrast with the strawberries.
Step 4: Pipe or spoon the cheesecake mixture into each hulled strawberry.
Carefully filling each strawberry allows for a generous amount while maintaining its structure. Use a piping bag for cleaner results and to better control the amount of filling. This step is key in creating that festive look that mimics Santa’s fluffy suit.
Step 5: Cut the tops off additional strawberries to create Santa hats and place them on filled strawberries.
By slicing the tops off, you create the perfect hat to sit atop the filled strawberry. Strategically placing each hat adds to the visual appeal, ensuring they look like Santas. This step enhances creativity and personalization in each dessert.
Step 6: Add mini chocolate chips for the eyes of the Santas.
Placing chocolate chips on the white cheesecake filling creates an adorable and recognizable facial expression for each Santa. This detail adds character to your desserts and shows attention to playful presentation, making them appealing to guests.
Step 7: Chill the Cheesecake Strawberry Santas in the refrigerator for at least one hour before serving.
Chilling helps the cheesecake filling firm up, allowing it to hold its shape when served. This step also enhances the flavors as they meld together, resulting in a deliciously refreshing taste experience. Be patient; the chilling time is essential for the best texture.

Creative Customizations for Your Cheesecake Santas
Tailor your Cheesecake Strawberry Santas by experimenting with different fillings or toppings. Swap the cheesecake for a chocolate mousse or a fruity yogurt-based filling for another flavor twist. You can also use edible glitter or colored sprinkles for a festive feel, making each creation unique and personally styled for holiday gatherings.
The Importance of Ingredient Quality
Using high-quality ingredients elevates the taste of your Cheesecake Strawberry Santas. Fresh, ripe strawberries are crucial for achieving that vibrant flavor, while quality cream cheese ensures a creamy, rich dessert. Making small choices in the selection of components can significantly impact the overall enjoyment of this whimsical treat.
Presenting Your Santas with Flair
Presentation can be just as important as taste, especially during the holiday season. Arrange the Cheesecake Strawberry Santas on a beautiful platter accompanied by a dusting of powdered sugar or a drizzle of chocolate sauce. Elevate the display with some seasonal greenery or festive decorations for a visually stunning centerpiece that captivates everyone at the table.
FAQs
What if the cheesecake filling is too thick?
If the filling seems too thick to pipe easily into the strawberries, you can gently fold in a little extra whipped cream or milk to loosen it up without compromising the texture.
Can I make these Santas with a different fruit?
Certainly! While strawberries are ideal, you can substitute with other fruits like raspberries or even small apples, but be mindful of the fruit's shape and size for a festive look.
What should I do if the strawberries aren’t standing upright?
Make sure to hull the strawberries evenly and trim a tiny amount from the bottom for better stability. A flat base is crucial in keeping them upright.
How can I make the eyes for my Santas without chocolate chips?
You can easily substitute mini chocolate chips with small candies like M&Ms or even dots of royal icing if you prefer a different look or taste.
What else can I add for decoration?
Consider adding tiny marshmallows for Santa's fluffy beard or using thin slices of other fruits as decorative elements. Get creative with your decorations to enhance their festive appearance.
Can I use a graham cracker crust for these Santas?
While the traditional cheesecake filling is served directly in strawberries, you can create a mini dessert by preparing a graham cracker base in mini cups and topping them with the cheesecake and strawberries for an added crunch.
Conclusion
Crafting Cheesecake Strawberry Santas is an enjoyable and engaging way to celebrate the holiday season with deliciousness and creativity. These festive treats not only satisfy your sweet tooth but also bring a joyful spirit to your table.
Whether for a holiday gathering or a cozy family dessert, these Santas are sure to delight both children and adults alike. Enjoy your culinary adventure in making these charming creations, and feel free to get creative with presentations and flavors.
Recipe Card
Savory Garlic Herb Roasted Chicken Delight
Ingredients
- 1 whole chicken 4-5 lbs
- 1 head of garlic cloves separated
- 2 tablespoons olive oil
- 1 tablespoon fresh thyme chopped
- 1 tablespoon fresh rosemary chopped
- 1 tablespoon fresh parsley chopped
- 1 lemon cut into wedges
- Salt and pepper to taste
Instructions
- Preheat the oven to 425°F (220°C).
- Prepare the chicken by patting it dry with paper towels.
- Rub olive oil all over the chicken, inside and out.
- Season generously with salt and pepper.
- Stuff the cavity with garlic cloves and lemon wedges.
- Sprinkle the herbs over the chicken and inside the cavity.
- Place the chicken in a roasting pan and tuck the wing tips under.
- Roast the chicken for approximately 1 hour and 15 minutes.
- Let the chicken rest for 10-15 minutes before carving.
Notes
Additional serving suggestions: pair with a crisp salad, garlic bread, or roasted seasonal vegetables for balance.
For make-ahead, prep components separately and assemble just before heating to preserve texture.
Taste and adjust with acid (lemon/vinegar) and salt right at the end to wake up flavors.


