
Introduction
There's something incredibly satisfying about crispy, cheesy pizza pockets that are quick and easy to make. With a handful of ingredients and just 15 minutes of your time, you can whip up these delightful pockets that are perfect for a snack, appetizer, or even a meal on the go.
This recipe capitalizes on the versatility of tortillas, turning them into a delicious vessel filled with your favorite pizza toppings. Whether you're cooking for yourself or entertaining friends, these crispy tortilla pizza pockets will impress with their taste and crunch.
Ingredients
- 4 large flour tortillas
Flour tortillas provide a chewy base that crisps up beautifully when baked or pan-fried. They hold the filling well without breaking, making them perfect for sturdy pockets. - 1 cup shredded mozzarella cheese
Mozzarella cheese melts smoothly and has a mild flavor, making it a classic choice for pizza. It pulls apart into delicious strings, giving each bite a satisfying texture. - 1/2 cup pizza sauce
Pizza sauce adds moisture and flavor, tying all the ingredients together. It helps prevent the fillings from becoming too dry and enhances the overall taste. - 1/2 cup diced pepperoni or preferred toppings
Pepperoni introduces a savory, slightly spicy component to the pockets. You can customize this ingredient according to your palate, using vegetables, cooked meats, or even a vegetarian option. - 1 tablespoon olive oil
Olive oil not only helps achieve a golden, crispy texture but also adds richness to the flavor profile. It acts as a binding agent for any seasonings you might choose to sprinkle on. - 1 teaspoon Italian seasoning (optional)
Italian seasoning can enhance the flavor of the pizza pockets by adding a robust mix of herbs like oregano, basil, and thyme. This optional ingredient makes the pockets taste even more like traditional pizza. - Salt and pepper to taste
Seasoning is essential for bringing out the flavors of the fillings. A touch of salt and pepper can elevate the overall taste, ensuring that every bite is flavorful.
Directions & Preparation
Step 1: Preheat your pan or oven.
Starting with a properly preheated surface is crucial for achieving the desired texture. If using a pan, heat it over medium heat for about 2 minutes. For an oven, set it to 400°F (200°C). This ensures a crispy finish and helps the cheese melt effectively.
Step 2: Prepare the tortillas.
Lay out the flour tortillas on a clean surface. This step is important because it allows you to evenly distribute your fillings later. Using room-temperature tortillas means they’re more pliable and won’t crack when folding.
Step 3: Spread pizza sauce on each tortilla.
Distributing a thin, even layer of pizza sauce will enhance the flavor and moisture level of your pockets. Be careful not to overdo it, as too much sauce can lead to sogginess. Leave about a half-inch border on the edges.
Step 4: Add toppings and cheese.
Layer your desired toppings followed by the mozzarella cheese evenly across the tortillas. This is where you can get creative! Remember, a good balance of toppings will keep the pockets from being overloaded or too sparse, ensuring that every bite is delicious.
Step 5: Fold the tortillas over to create pockets.
Carefully fold the tortillas in half, enclosing the fillings. Press the edges gently to seal, which helps contain the ingredients while cooking. You can use a fork to crimp the edges for extra security and a decorative touch.
Step 6: Brush with olive oil and sprinkle seasoning.
Brushing the outside of the pockets with olive oil will promote browning and crispiness. If you choose to use Italian seasoning, this is the time to sprinkle it on, adding a fragrant touch that complements the pizza flavor.
Step 7: Cook the pockets in the pan or oven.
If using a pan, cook the pockets for about 3-4 minutes on each side until golden brown and crispy. In the oven, place them on a baking sheet for around 10-12 minutes, flipping halfway through. It’s important to watch closely, as cooking times can vary based on the heat source.
Step 8: Serve hot with dipping sauce.
Let the pizza pockets cool for just a minute before serving. Pair them with additional pizza sauce, ranch dressing, or your sauce of choice for dipping. This finishing touch enhances the flavor and makes for a delightful dining experience.

Customize Your Filling Choices
One of the best features of crispy tortilla pizza pockets is their adaptability. You can fill them with whatever toppings you love, from classic pepperoni and mushrooms to grilled veggies or even BBQ chicken. This flexibility makes it easy to accommodate dietary preferences and impress picky eaters.
Make Ahead for Busy Days
Preparation is key for busy schedules. If you know you’ll have a hectic day, consider assembling these pizza pockets in advance. You can store them in the fridge for up to a day before cooking. Just remember to allow them to warm up slightly before cooking for the best texture.
Experiment with Dipping Sauces
While pizza sauce is a classic pairing, feel free to explore different dipping sauces. Ranch, garlic butter, or spicy sriracha mayo can elevate your pizza pockets further. Get creative with your dips, as they can each bring their unique flavor combinations to the table.
FAQs
What should I do if the filling overflows?
If some filling spills out, don’t panic! Just serve it as a side or enjoy it directly from the skillet. To avoid this in the future, ensure not to overfill each pocket.
Can I use corn tortillas instead?
Yes! Corn tortillas can add a unique flavor and are often gluten-free. Just be cautious, as they are more fragile and may need extra care while folding.
Why did my pizza pockets turn out too oily?
Excess oil can come from not properly measuring or from using too much when brushing. Use a light hand when applying oil, and consider blotting any greasy spots with a paper towel after cooking.
Can I bake multiple pockets at once?
Certainly! Just ensure not to overcrowd the baking sheet, as this might lead to uneven cooking. Give enough space for each pocket to cook evenly and crisp up nicely.
What if the cheese didn't melt fully?
If you find that the cheese hasn’t melted, it could be a matter of cooking time or temperature. Increasing the cook time slightly or using a broiler for a minute can help achieve that gooey melt you’re aiming for.
How do I make them spicier?
To add a spicy kick, include jalapeños, hot sauce, or spicy sausage in your filling. Adjust according to your heat tolerance for a perfect balance.
Conclusion
Crispy tortilla pizza pockets provide a satisfying and adaptable meal option that combines convenience with flavor. Their quick prep time makes them an ideal choice for busy weekday dinners or a fun snack for gatherings.
As you experiment with various fillings and dips, you'll discover endless possibilities that can turn these simple pockets into family favorites. Enjoy the crunch, the flavor, and the joy of creating a dish that everyone will love.
Recipe Card
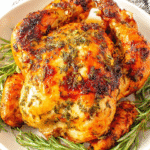
Savory Garlic Herb Roasted Chicken Delight
Ingredients
- 1 whole chicken 4-5 lbs
- 1 head of garlic cloves separated
- 2 tablespoons olive oil
- 1 tablespoon fresh thyme chopped
- 1 tablespoon fresh rosemary chopped
- 1 tablespoon fresh parsley chopped
- 1 lemon cut into wedges
- Salt and pepper to taste
Instructions
- Preheat the oven to 425°F (220°C).
- Prepare the chicken by patting it dry with paper towels.
- Rub olive oil all over the chicken, inside and out.
- Season generously with salt and pepper.
- Stuff the cavity with garlic cloves and lemon wedges.
- Sprinkle the herbs over the chicken and inside the cavity.
- Place the chicken in a roasting pan and tuck the wing tips under.
- Roast the chicken for approximately 1 hour and 15 minutes.
- Let the chicken rest for 10-15 minutes before carving.
Notes
Additional serving suggestions: pair with a crisp salad, garlic bread, or roasted seasonal vegetables for balance.
For make-ahead, prep components separately and assemble just before heating to preserve texture.
Taste and adjust with acid (lemon/vinegar) and salt right at the end to wake up flavors.


