Introduction
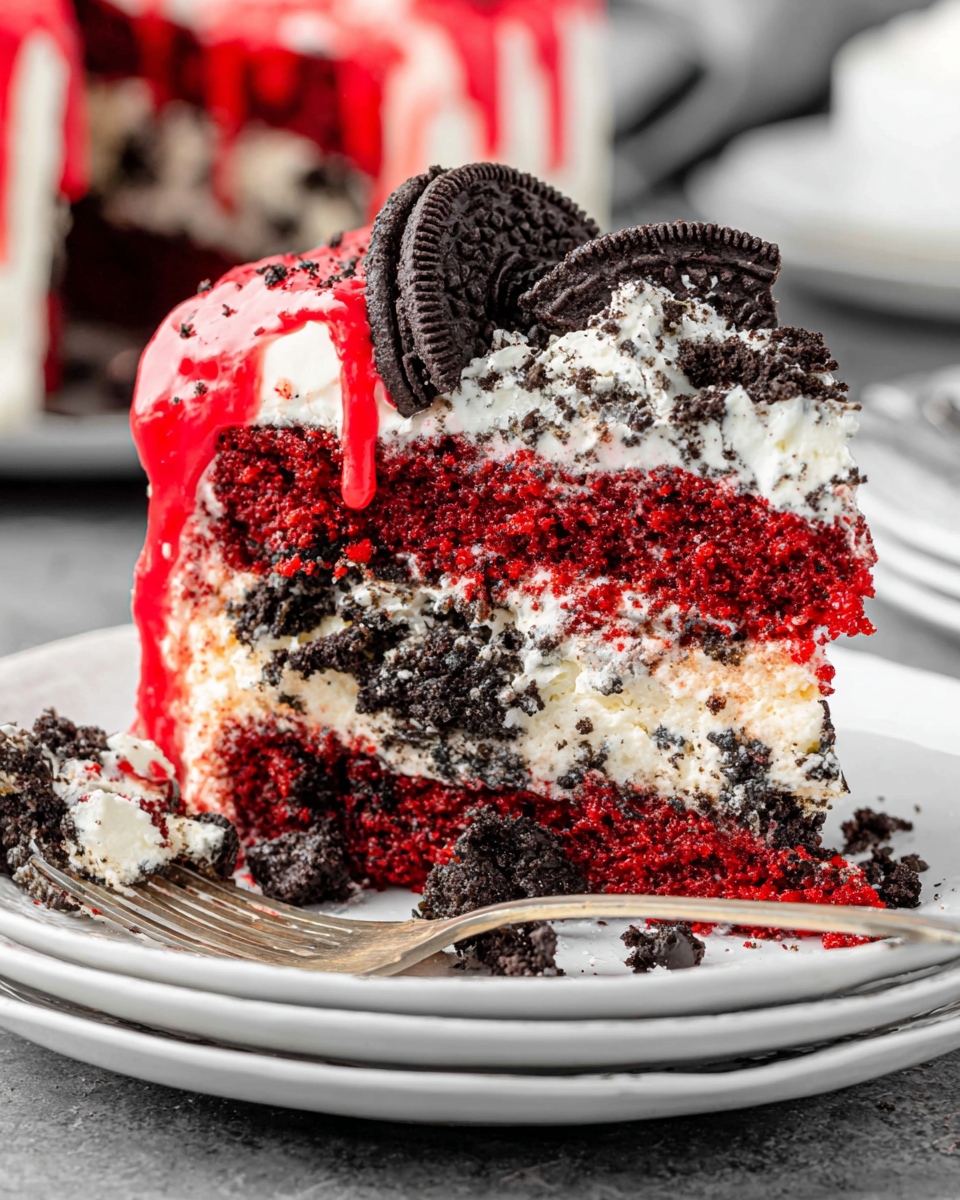
If you're seeking a show-stopping dessert that combines rich flavors and striking visuals, look no further than the Oreo Red Velvet Cheesecake Drip Cake. This stunning confection features layers of velvety red velvet cake, luscious cheesecake, and a decadent Oreo ganache, making it an impressive centerpiece for any celebration.
Each bite is a harmonious blend of chocolatey, creamy, and tangy flavors, sure to impress family and friends. The striking red color paired with the contrasting white cheesecake layer not only pleases the palate but also delights the eyes.
Ingredients
- 2 cups all-purpose flour
Flour provides the structure for the cake, creating a stable base for the layers. The balance of proteins in flour helps trap air during mixing, resulting in a tender crumb. - 2 cups granulated sugar
Sugar sweetens the cake and also contributes to its moisture, leading to a tender texture. It plays a crucial role in browning, enhancing the cake's flavor with caramel notes. - 1 teaspoon baking powder
Baking powder acts as a leavening agent, ensuring that the cake rises effectively and achieves a fluffy texture. It releases gases during baking that help the cake expand. - 1 teaspoon baking soda
Baking soda provides additional leavening and also reacts with acidic ingredients like cocoa powder and buttermilk, creating a light and airy crumb in the cake. - 1 teaspoon salt
Salt enhances the natural flavors in the ingredients and balances the sweetness of the cake. It also strengthens gluten, contributing to a better texture. - 1 cup vegetable oil
Oil adds moisture and richness to the cake, keeping it soft and tender. It helps maintain freshness for a longer period compared to butter. - 1 cup buttermilk
Buttermilk adds acidity, which helps the baking soda and baking powder work effectively, resulting in a light texture. It also contributes to a subtle tanginess in flavor. - 2 large eggs
Eggs provide structure and stability to the cake as they coagulate when baked. They add richness and moisture, enhancing the overall flavor and texture. - 2 tablespoons cocoa powder
Cocoa powder imparts a deep chocolate flavor to the red velvet cake, creating a subtle contrast with the creamier cheesecake layer. - 1 teaspoon vanilla extract
Vanilla adds a warm, sweet aroma that enhances the other flavors in the cake, providing a depth that rounds out the taste. - 16 oz cream cheese, softened
Cream cheese forms the base of the cheesecake layer, providing a rich and tangy flavor. Its creamy texture is essential for achieving the desired consistency. - 1 cup powdered sugar
Powdered sugar sweetens the cheesecake without adding graininess, ensuring a smooth and creamy texture. It also helps stabilize the cheesecake once whipped in. - 1 teaspoon vanilla extract (for cheesecake)
Vanilla elevates the creamy flavor profile of the cheesecake, enhancing its overall taste and making it more indulgently fragrant. - 4 oz Oreo cookies, crushed
Crushed Oreos contribute a delightful cookie crunch and rich chocolate flavor to the cheesecake layer, complementing the red velvet and adding visual contrast. - 1/2 cup heavy cream
Heavy cream is used to make the ganache, providing a rich, luxurious texture. It helps create a glossy finish that complements the cake beautifully. - 1 cup semi-sweet chocolate chips
Chocolate chips are the base for the ganache, providing a rich chocolate flavor. They melt creamily with the heavy cream, creating a smooth drizzle effect. - Extra crushed Oreos for garnish
Using crushed Oreos as a garnish adds a final touch of texture and flavor to the cake, tying the theme together and making it visually appealing.
Directions & Preparation
Step 1: Preheat the oven to 350°F (175°C) and prepare two 9-inch round cake pans with cooking spray and parchment paper.
Preheating the oven ensures that your cake bakes evenly and rises properly from the start. Preparing the pans with spray and parchment prevents sticking, thus ensuring a clean release when you plate your cake.
Step 2: In a mixing bowl, combine the flour, sugar, baking powder, baking soda, cocoa powder, and salt.
Mixing the dry ingredients separately ensures even distribution of leavening agents and cocoa powder throughout the flour. This uniformity is key to achieving a consistent texture across your entire cake.
Step 3: In another bowl, whisk together the oil, buttermilk, eggs, and vanilla extract until well incorporated.
Combining the wet ingredients thoroughly allows for a uniform mixture that will help in hydrating the flour properly. This step also incorporates air, contributing to the cake’s final light and fluffy texture.
Step 4: Gradually add the wet ingredients to the dry ingredients, mixing until just combined.
Overmixing can lead to dense cakes, so stirring until just combined ensures the batter retains some air. This is critical for lightness, especially in a layered cake like this.
Step 5: Divide the batter evenly between the prepared pans and smooth the tops. Bake for 25-30 minutes, or until a toothpick inserted in the center comes out clean.
Even distribution of batter ensures that both layers bake uniformly. Checking for doneness with a toothpick is crucial; it guarantees that the cake is fully cooked through without being overbaked.
Step 6: Allow the cakes to cool in pans for 10 minutes before transferring them to a wire rack to cool completely.
Cooling in the pan briefly allows the cake to firm up, minimizing the risk of breakage when transferring. Letting them cool completely on a wire rack ensures no moisture builds up, preventing sogginess.
Step 7: In the meantime, prepare the cheesecake layer by beating the softened cream cheese and powdered sugar until smooth.
Making sure the cream cheese is softened is vital for achieving a smooth mixture, as cold cream cheese can lead to lumps. Mixing it with powdered sugar integrates sweetness and air, contributing to a fluffy texture.
Step 8: Mix in the vanilla extract and crushed Oreos until well distributed.
Adding vanilla and Oreos at this stage ensures their flavors are evenly intermingled throughout the cheesecake layer, enhancing both taste and texture.
Step 9: Spread the cheesecake mixture evenly over one of the cooled red velvet cake layers and top with the second layer.
Layering the cheesecake between the cake layers not only adds creaminess but also creates a beautiful cross-section when sliced. Smooth application ensures even flavor distribution as well.
Step 10: Chill the assembled cake in the refrigerator for at least 4 hours, or overnight if possible, to allow the cheesecake layer to set.
Chilling the cake will firm up the cheesecake layer, making it easier to slice and serve. This step is essential for achieving the right consistency and flavor melding.
Step 11: Prepare the ganache by heating the heavy cream until it begins to simmer, then pour it over the chocolate chips in a bowl. Let it sit for 5 minutes, then stir until smooth.
Heating the cream activates the melting of the chocolate chips, resulting in a velvety ganache. Allowing it to sit before mixing ensures the chocolate melts uniformly, leading to a glossy finish.
Step 12: Once the ganache is smooth and slightly cooled, remove the cake from the fridge and pour the ganache over the top, allowing it to drip down the sides.
The ganache drips down the sides create a stunning visual effect. Ensure it’s not too hot to avoid melting the cake layers, and use a spatula to help guide the flow if necessary.
Step 13: Finish by decorating the top with extra crushed Oreos and any other desired toppings before serving.
Garnish not only adds texture but also brings visual appeal to the cake. Creative placement of the Oreos enhances the dessert's attractiveness and ties the flavors back to the original elements.

The Charm of Red Velvet
Red velvet cake has a unique allure, characterized by its vivid red hue and velvety texture. Traditionally, the cake's subtle flavor comes from the combination of cocoa and buttermilk, creating a complex taste. In this recipe, the red velvet flavor pairs beautifully with the creamy cheesecake, enriching the overall experience and providing each slice with a delightful contrast.
Cheesecake as the Star Layer
Cheesecake plays a pivotal role, adding a creamy richness that complements the lightness of the red velvet. With the hero ingredient—cream cheese—it delivers a distinct balance of tanginess and sweetness, ensuring that the cake doesn’t become overly sweet. The added crunch from the crushed Oreos infuses a delightful texture, elevating the overall dessert experience.
Drip Cake Aesthetics
The drip effect of chocolate ganache has become a beloved trend in the baking world, merging artistry with indulgence. Aesthetically pleasing, it transforms a simple cake into a breathtaking centerpiece. In this recipe, the glossy dark chocolate contrasts with the vibrant red and the creamy layers, catching the eye and inviting guests to indulge, making it perfect for special occasions.
FAQs
What if my red velvet layers are too dry?
If your layers are dry, consider reducing the baking time slightly next time to ensure they stay moist. Check with a toothpick a few minutes earlier to avoid overbaking.
Can I use different cookies for the cheesecake layer?
Yes, you can substitute the Oreos with any favorite cookies. Just ensure they complement the flavors of red velvet for the best results.
What if my ganache is too thick?
If your ganache is too thick to drizzle, gently reheat it with a bit more cream until it reaches your desired pouring consistency.
How can I make my cheesecake layer thicker?
For a thicker cheesecake layer, consider adding more cream cheese or reducing the amount of whipped cream in your mixture.
What if my cake layers over-bake and become too dense?
If this happens, check your oven temperature; it may be running hot. Also, ensure you don’t overmix the batter as this can lead to a denser cake.
Can I modify the recipe for smaller layers?
Absolutely! To make smaller layers, simply divide the quantities by half and use shorter baking times, checking for doneness consistently.
Conclusion
The Oreo Red Velvet Cheesecake Drip Cake is more than just a dessert; it's an experience that combines various textures and flavors to delight the senses. Each forkful brings together the richness of cheesecake with the playful elements of red velvet and chocolate, making it a treat to remember.
Whether for a special occasion or a well-deserved dessert at home, this cake is sure to impress with its looks and taste. Dive into this delightful culinary adventure and relish each indulgent bite.
Recipe Card

Butternut Squash Pasta with Sausage and Spinach Recipe
Ingredients
- 8 ounces pasta your choice
- 1 medium butternut squash peeled and cubed
- 1 pound Italian sausage mild or spicy
- 2 cups fresh spinach
- 1 onion diced
- 4 cloves garlic minced
- 1 teaspoon dried rosemary
- 1/2 cup grated Parmesan cheese
- Salt and pepper to taste
- 2 tablespoons olive oil
Instructions
- Preheat your oven to 400°F (200°C).
- Toss the cubed butternut squash in 1 tablespoon of olive oil, salt, and pepper. Spread on a baking sheet and roast for 25-30 minutes.
- Meanwhile, cook the pasta according to package instructions until al dente. Drain and set aside.
- In a large skillet, heat the remaining tablespoon of olive oil over medium heat. Add the diced onion and garlic, sauté until translucent.
- Add the Italian sausage to the skillet. Break it apart and cook until browned and cooked through.
- Stir in the roasted butternut squash, spinach, and rosemary into the skillet, cooking until the spinach wilts.
- Add the cooked pasta to the skillet and toss everything together. Sprinkle in the Parmesan cheese and mix until melted.
- Season with salt and pepper to taste, then serve warm.
Notes
Additional serving suggestions: pair with a crisp salad, garlic bread, or roasted seasonal vegetables for balance.
For make-ahead, prep components separately and assemble just before heating to preserve texture.
Taste and adjust with acid (lemon/vinegar) and salt right at the end to wake up flavors.


