Introduction
The holiday season brings out a special kind of nostalgia, especially when it comes to sweet treats. For many, Little Debbie Christmas Tree Cakes are a cherished festive tradition that conjures up warm memories of childhood. These delightful truffles take that beloved treat and transform it into an indulgent and shareable dessert.
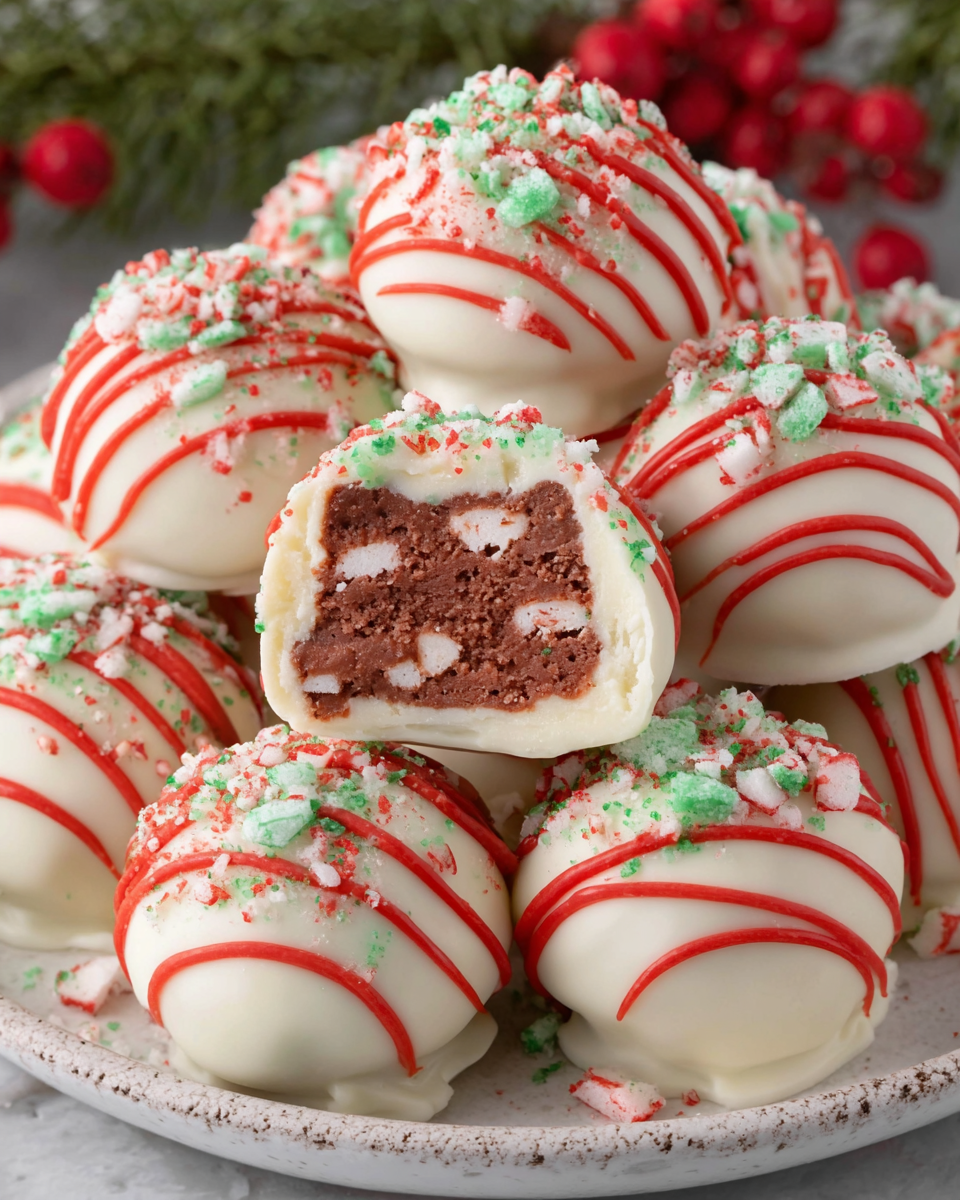
Soft, creamy, and coated in chocolate, Little Debbie Christmas Tree Cake Truffles encapsulate the flavors of vanilla, chocolate, and festive cheer in a bite-sized treat. Perfect for holiday gatherings or as a special gift, these truffles are not just easy to make—they’re sure to dazzle anyone lucky enough to receive them.
Ingredients
- 1 box Little Debbie Christmas Tree Cakes
These iconic cakes serve as the base for our truffles, providing the signature flavor and texture that makes them so special. The cakes contain that sweet vanilla flavor and festive green color that represents the holiday spirit. - 8 oz cream cheese, softened
Cream cheese adds richness and a creamy texture to the truffle mixture. It helps bind the crumbled cakes together while also adding a subtle tanginess that balances the sweetness. - 2 cups white chocolate chips
White chocolate chips are melted and used to coat the truffles, lending them a smooth, creamy outer layer that complements the flavors inside. This sweetness enhances the overall treat, creating a delicious contrast. - 1 tablespoon vegetable oil
Vegetable oil helps to thin the melted white chocolate, making it easier to coat the truffles smoothly. This step is crucial to achieving that glossy finish on your treats. - Sprinkles or festive decorations (optional)
Sprinkles add a colorful touch to the truffles, making them even more festive and appealing. They bring a bit of extra crunch and color that delights the eye and enhances the holiday spirit.
Directions & Preparation
Step 1: Crumble the Little Debbie Christmas Tree Cakes into a large bowl.
Start by carefully removing the cakes from their packaging and place them in a bowl. Use your hands or a fork to crumble them into fine pieces. This step is crucial as it will form the base of your truffles, allowing the cream cheese to bind everything together more effectively. Ensure there are no large pieces left, so the truffles hold their shape.
Step 2: Add the softened cream cheese to the crumbled cake mix.
Incorporating the softened cream cheese is vital as it marries the crumbled cakes into a cohesive mixture. Use a spatula or your hands to mix until thoroughly combined. The cream cheese should be at room temperature to ensure easy blending. The result should be a thick, moldable dough that resembles cookie dough without being overly sticky.
Step 3: Chill the mixture for about 30 minutes in the refrigerator.
Chilling the dough is a crucial step that allows it to firm up, making it easier to roll into balls. The refrigerated mixture will also enhance the flavors as they meld together. Use this quiet time to prepare your workstation for rolling and coating the truffles.
Step 4: Roll the chilled mixture into small balls, about 1 inch in diameter.
Scoop out small portions of the dough and roll them between your palms to form uniform balls. This ensures consistent size and shape, which is important for even coating later. Try to resist the urge to make them too large, as smaller truffles are more manageable and allow for a greater distribution of flavor.
Step 5: Melt the white chocolate chips with the vegetable oil in a microwave-safe bowl.
Carefully melting the chocolate is essential for achieving a smooth coating. Do this in short intervals, stirring frequently to prevent overheating. Adding vegetable oil not only helps to thin the chocolate but also contributes to a glossy finish. The ideal consistency should be pourable, not too thick or too runny.
Step 6: Coat each ball in the melted white chocolate, then place on a parchment-lined baking sheet.
Dipping each truffle in the melted white chocolate creates a beautiful, delicious shell. Use a fork or toothpick to help you dip and lift the truffles, shaking off excess chocolate before placing them on the parchment. This method prevents them from sticking together and gives them a polished look.
Step 7: Sprinkle with festive decorations before the chocolate sets.
Adding sprinkles or other decorations while the chocolate is still wet will ensure they stick properly. This final touch not only enhances the visual appeal but also adds a bit of texture and fun to each bite. Be creative with the colors to match the holiday theme!
Step 8: Allow the truffles to set at room temperature or refrigerate to speed up the process.
Letting the truffles set is vital for ensuring the coating hardens properly. If you're in a hurry, placing them in the refrigerator will speed up this process without compromising texture. Once set, these truffles can be enjoyed immediately or stored for later pleasure.

Understanding Flavor Combinations
The beauty of these truffles lies in the perfect blend of flavors that evoke nostalgia. Combining the rich sweetness of the white chocolate with the creamy tang of the cream cheese creates a delightful profile that complements the soft vanilla base of the Little Debbie cakes. Consider playing with flavor variations by adding extracts like peppermint or almond to customize your treat for festive gatherings.
Creating a Festive Display
Presentation enhances the enjoyment of any sweet treat, and these truffles are no exception. For holiday gatherings, arrange your truffles on a decorative platter and garnish with fresh herbs or edible flowers to create an inviting display. This not only makes the dessert table appealing but also sets a merry atmosphere for your guests.
Gifting Ideas for the Holidays
These Little Debbie Christmas Tree Cake Truffles make a delightful homemade gift for friends and loved ones. Package them in decorative boxes or jars, and consider including a small note with serving suggestions or temperature recommendations for the best taste. Homemade treats show thoughtfulness and love during the holiday season.
FAQs
What should I do if my truffle mixture is too dry?
If your mixture feels too dry, you can add a bit more softened cream cheese until it reaches a moldable consistency. Be careful not to overdo it, as this can lead to overly sticky truffles.
Can I use regular chocolate chips instead of white chocolate?
Yes, you can substitute milk or dark chocolate chips for white chocolate. Just be mindful of the melting process and adjust the amount of oil accordingly to achieve a smooth coating.
What if the melted chocolate isn’t coating evenly?
If your melted chocolate seems thick or clumpy, reheat it gently with a little more oil, stirring until it's smooth. This will improve its consistency and make for a better coating.
How can I avoid the truffles sticking to each other?
Ensure each truffle is adequately coated and shake off excess chocolate before placing them on the baking sheet. Allowing them to set sufficiently apart will also help prevent sticking.
What if my truffles are too sweet?
If you find your truffles overly sweet, consider adding a pinch of salt to the coating or to the mixture itself, as salt balances sweetness and enhances flavors.
Can I use gluten-free Christmas Tree Cakes?
Yes, if you need a gluten-free option, search for brands that offer gluten-free alternatives to Little Debbie cakes, or make your own version from scratch.
Conclusion
These Little Debbie Christmas Tree Cake Truffles are not just festive; they are a delightful way to bring joy to the holiday season. Their combination of creamy textures and bright flavors makes them irresistible to everyone lucky enough to try them.
So, gather your ingredients and create these delicious truffles to celebrate the holidays. Whether for sharing with loved ones or as a treat for yourself, they are sure to leave a lasting impression with every bite.
Recipe Card

Butternut Squash Pasta with Sausage and Spinach Recipe
Ingredients
- 8 ounces pasta your choice
- 1 medium butternut squash peeled and cubed
- 1 pound Italian sausage mild or spicy
- 2 cups fresh spinach
- 1 onion diced
- 4 cloves garlic minced
- 1 teaspoon dried rosemary
- 1/2 cup grated Parmesan cheese
- Salt and pepper to taste
- 2 tablespoons olive oil
Instructions
- Preheat your oven to 400°F (200°C).
- Toss the cubed butternut squash in 1 tablespoon of olive oil, salt, and pepper. Spread on a baking sheet and roast for 25-30 minutes.
- Meanwhile, cook the pasta according to package instructions until al dente. Drain and set aside.
- In a large skillet, heat the remaining tablespoon of olive oil over medium heat. Add the diced onion and garlic, sauté until translucent.
- Add the Italian sausage to the skillet. Break it apart and cook until browned and cooked through.
- Stir in the roasted butternut squash, spinach, and rosemary into the skillet, cooking until the spinach wilts.
- Add the cooked pasta to the skillet and toss everything together. Sprinkle in the Parmesan cheese and mix until melted.
- Season with salt and pepper to taste, then serve warm.
Notes
Additional serving suggestions: pair with a crisp salad, garlic bread, or roasted seasonal vegetables for balance.
For make-ahead, prep components separately and assemble just before heating to preserve texture.
Taste and adjust with acid (lemon/vinegar) and salt right at the end to wake up flavors.


