
Introduction
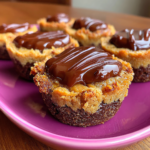
Twix Cookie Cups combine the classic flavors of chocolate, caramel, and cookies into an irresistible bite-sized treat. These delightful morsels are not only visually appealing but also offer a harmonious blend of textures, making them perfect for any occasion.
Whether you're hosting a party, looking for a fun baking project with kids, or simply craving something sweet, Twix Cookie Cups are the answer. With a crisp cookie base, rich chocolate, and a gooey caramel center, they deliver a mouthwatering experience that will have everyone coming back for more.
Ingredients
- 1 cup all-purpose flour
The foundation of the cookie cups, all-purpose flour provides structure and stability. It helps bind the other ingredients together and contributes to the overall texture, allowing for that desirable cookie crunch. - 1/2 cup unsweetened cocoa powder
Cocoa powder adds rich chocolate flavor and the distinct dark coloring to the cookie base. It enhances the overall taste, ensuring that chocolate lovers are thoroughly satisfied with each bite. - 1/2 teaspoon baking soda
Baking soda acts as a leavening agent, helping the cookie cups rise during baking. This results in a lighter, airy texture that balances the denser ingredients like chocolate and caramel. - 1/2 teaspoon salt
Salt enhances the flavors of the cookie and balances the sweetness. It’s crucial in baking as it helps to bring out the best in the other ingredients, amplifying the overall taste of the cookie cups. - 1/2 cup unsalted butter, softened
Butter provides moisture and richness to the cookie dough. Its creamy texture helps create a tender crumb while adding a delightful flavor that binds the cookie together. - 1/2 cup granulated sugar
Granulated sugar not only sweetens the cookie but also contributes to browning, providing a caramelized, crisp exterior. It aids in the overall texture, making the cups perfectly chewy on the inside. - 1/4 cup brown sugar, packed
Brown sugar adds moisture and a deeper flavor due to its molasses content. It helps create a chewy texture while enhancing the overall taste profile of the cookie cups with its caramel hints. - 1 large egg
Eggs bind the ingredients together and provide structure. They contribute to the richness and moisture of the cookie cups, resulting in a satisfying texture. - 1 teaspoon vanilla extract
Vanilla extract elevates the flavor, adding warmth and sweetness to the cookie cups. It enhances the overall aroma, making the baking experience even more enjoyable. - 1 cup caramel sauce
Caramel sauce forms the center of the cookie cups, providing a gooey, sweet contrast to the rich chocolate and cookie exterior. It’s what gives these treats their iconic Twix-like appeal. - 1 cup chocolate chips
Chocolate chips are melted and used to top the cookie cups, adding an extra layer of chocolatey goodness. They provide a rich and delightful finishing touch that pairs wonderfully with the caramel.
Directions & Preparation
Step 1: Preheat the oven to 350°F (175°C).
Preheating the oven is crucial for achieving the right cookie texture. This step ensures the cookies cook evenly, rising appropriately from the moment they hit the heat. A properly preheated oven will give your cookie cups a perfect balance of chewiness and crispness.
Step 2: In a medium bowl, mix together the flour, cocoa powder, baking soda, and salt.
Combining dry ingredients first is essential for even distribution of the leavening agent and flavorings. This helps ensure that every cookie has a consistent taste and texture. Whisking these ingredients together also aerates them, which contributes to a lighter cookie structure.
Step 3: In a large bowl, beat the softened butter, granulated sugar, and brown sugar until fluffy.
Creaming the butter and sugars together introduces air into the mixture, which will help the cookies rise when baked. This process creates a light and airy texture, essential for a perfect mouthfeel. Ensure the butter is softened to room temperature for optimal incorporation.
Step 4: Add the egg and vanilla extract to the butter mixture, and mix until well combined.
Incorporating the egg and vanilla adds moisture and flavor, creating a rich dough. Mixing them thoroughly ensures that the mixture is homogenous, which is key for a consistent texture throughout the cookie cups.
Step 5: Gradually add the dry ingredients to the wet mixture, mixing until just combined.
This step is important as over-mixing can lead to tough cookies. By mixing until just combined, you keep the texture tender and ensure an enjoyable bite. It’s okay if some dry streaks remain, as they will incorporate during the next step.
Step 6: Scoop tablespoon-sized portions of dough into a greased muffin tin, pressing them down to form cups.
Properly shaping the dough into cups is critical for holding the caramel filling later. Pressing the dough firmly into the muffin tin ensures that the cups maintain their shape during baking. Make sure to leave space between each to allow for the cookies to expand.
Step 7: Bake in the preheated oven for 12-15 minutes, or until the edges are set.
Baking the cookie cups until the edges are set provides a sturdy structure for the caramel and chocolate topping. Keep an eye on them, as oven temperatures can vary. The centers will continue to firm up after removing them from the oven, so avoid over-baking.
Step 8: Allow the cookie cups to cool for 10 minutes before filling with caramel sauce.
Letting the cups cool slightly helps them hold their shape when filled. If they are too hot, the caramel may melt and not adhere properly. Cooling for the recommended time ensures an ideal creamy center without sacrificing the cookie integrity.
Step 9: Fill each cup with caramel sauce, then let it set while you melt the chocolate chips.
Filling the cups with caramel creates that signature Twix flavor. Allowing it to set ensures the caramel doesn’t overflow when topping with chocolate. This step brings all the elements together harmoniously, building a balanced dessert.
Step 10: Melt the chocolate chips in a microwave-safe bowl, stirring until smooth.
Melting chocolate until smooth is vital for a glossy finish on the cookie cups. Using short bursts in the microwave prevents overheating and burning. Stirring during the melting process ensures even consistency, leading to a beautifully finished dessert.
Step 11: Spoon the melted chocolate over the caramel-filled cookie cups.
Topping the caramel with melted chocolate seals in the sweetness and creates a stunning appearance. It also enhances the overall flavor profile, adding a rich finishing touch that balances the sweetness of the caramel perfectly. Let the chocolate set before serving for the best texture.

Gooey Caramel Centers
The caramel sauce in Twix Cookie Cups doesn't just add sweetness; it infuses the treat with a lovely gooey texture that contrasts beautifully with the cookie shell. This element is what brings the nostalgic Twix experience to life, making each bite a melodious harmony of flavors and sensations.
The Perfect Chocolate Topping
Melting the chocolate chips for a glossy finish elevates these cookie cups from simple to extraordinary. This glossy layer enhances the visual appeal and adds a rich, satisfying chocolate flavor that perfectly complements the sweetness of the caramel, resulting in a luscious treat everyone loves.
Fun for All Occasions
Twix Cookie Cups are not only delightful to eat but also fun to make! They’re great for baking sessions with children, holiday treat-making, or even as gifts. Their versatility makes them suitable for various occasions, from casual get-togethers to festive parties, promising delight to both the baker and the audience.
FAQs
What if my cookie cups overflow during baking?
To prevent overflow, ensure you’re not overfilling the muffin tin with dough. If they do overflow, you can carefully trim the excess after baking.
Can I use store-bought caramel sauce?
Yes, store-bought caramel sauce works perfectly in this recipe. It saves time and still provides that delicious caramel flavor without any compromise.
Why are my cookie cups too dry?
Overbaking can cause dryness in cookie cups. Ensure you’re baking them just until the edges are set and checking them regularly towards the end of the baking time.
What can I do if my cookie dough is too crumbly?
If your cookie dough is too crumbly, it might be due to not enough moisture. Try adding a tablespoon of milk or melted butter to bind the dough together better.
Can I double the recipe for a larger batch?
Absolutely! Doubling the recipe is straightforward. Just ensure your mixing bowl is large enough to accommodate the additional ingredients.
How do I know when the chocolate is properly melted?
The chocolate is properly melted when it is smooth and shiny, without lumps. Stir it every 20 seconds to prevent burning and ensure an even melt.
Conclusion
Making Twix Cookie Cups is a rewarding experience that brings together sweet, salty, and chocolatey flavors in a delightful treat. The combination of a crispy cookie shell and gooey caramel center topped with melted chocolate creates an indulgence that is hard to resist.
Whether enjoying them with family, sharing with friends, or indulging alone, these cookie cups are sure to impress. Their versatility and rich flavors make them a must-try for any dessert lover.
Recipe Card
Delicious Twix Cookie Cups to Satisfy Your Sweet Tooth
Ingredients
- 1 cup all-purpose flour
- 1/2 cup unsweetened cocoa powder
- 1/2 teaspoon baking soda
- 1/2 teaspoon salt
- 1/2 cup unsalted butter softened
- 1/2 cup granulated sugar
- 1/4 cup brown sugar packed
- 1 large egg
- 1 teaspoon vanilla extract
- 1 cup caramel sauce
- 1 cup chocolate chips
Instructions
- Preheat the oven to 350°F (175°C).
- In a medium bowl, mix together the flour, cocoa powder, baking soda, and salt.
- In a large bowl, beat the softened butter, granulated sugar, and brown sugar until fluffy.
- Add the egg and vanilla extract to the butter mixture, and mix until well combined.
- Gradually add the dry ingredients to the wet mixture, mixing until just combined.
- Scoop tablespoon-sized portions of dough into a greased muffin tin, pressing them down to form cups.
- Bake in the preheated oven for 12-15 minutes, or until the edges are set.
- Allow the cookie cups to cool for 10 minutes before filling with caramel sauce.
- Fill each cup with caramel sauce, then let it set while you melt the chocolate chips.
- Melt the chocolate chips in a microwave-safe bowl, stirring until smooth.
- Spoon the melted chocolate over the caramel-filled cookie cups.
Notes
Additional serving suggestions: pair with a crisp salad, garlic bread, or roasted seasonal vegetables for balance.
For make-ahead, prep components separately and assemble just before heating to preserve texture.
Taste and adjust with acid (lemon/vinegar) and salt right at the end to wake up flavors.


