Introduction
As the holiday season approaches, many home cooks begin to seek out sweet treats that capture the spirit of celebration. One festive favorite that stands out is the Little Debbie Christmas Tree Cake, known for its vibrant colors and delicious flavors. Transforming those beloved flavors into truffles is a wonderful way to bring joy to your dessert table or treat loved ones.
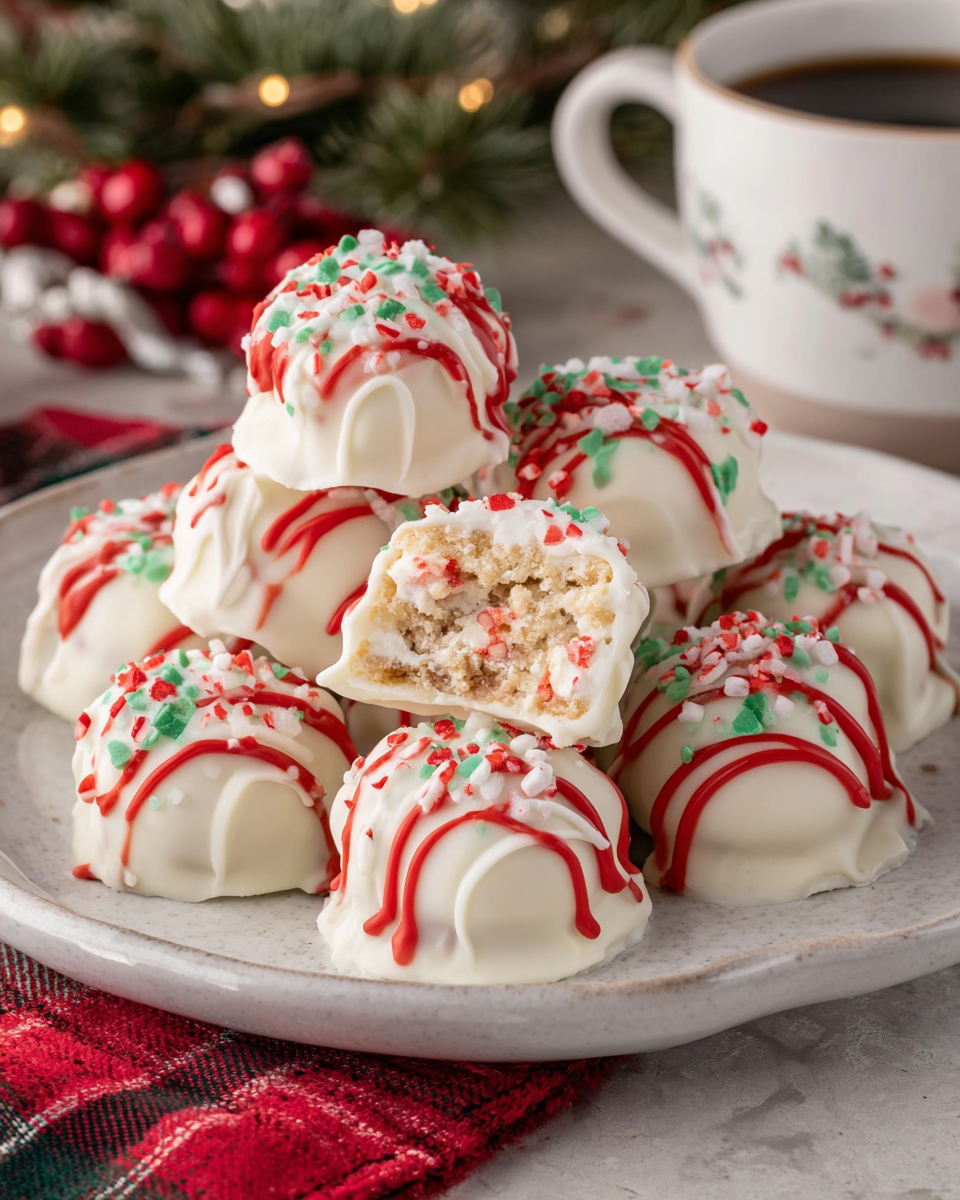
These Little Debbie Christmas Tree Cake Truffles are a delightful twist on a classic. They encapsulate the essence of the iconic cake – sweet vanilla cake blended with cream cheese and enveloped in rich chocolate. Perfect as a festive gift, holiday party treat, or just a special indulgence for yourself, these truffles are sure to impress.
Ingredients
- 1 box Little Debbie Christmas Tree Cakes
The foundation of this recipe, these cakes provide the sweet, vanilla flavor and texture that mimic the classic dessert. They are convenient, eliminating the need for baking from scratch. - 8 oz cream cheese, softened
Cream cheese adds a rich creaminess to the truffles, helping to bind the mixture together while providing a slight tang that balances the sweetness. - 1 cup finely crushed graham crackers
These crumbs not only give the truffles a slight crunch but also contribute to the texture, creating a more complex mouthfeel. - 1 cup white chocolate chips
Melted white chocolate serves as both a coating and a key flavor component, adding sweetness and a lovely silky finish to each truffle. - 1 tbsp vegetable oil
This is mixed with the white chocolate to help achieve a smoother consistency when melting, making it easier to coat the truffles. - 1/4 cup festive sprinkles
Sprinkles not only enhance the visual appeal of the truffles, giving them a festive look, but they also add a surprising crunch that makes each bite more enjoyable.
Directions & Preparation
Step 1: Prepare the Truffle Mixture
Begin by taking the Little Debbie Christmas Tree Cakes and crumbling them into a large mixing bowl until they resemble fine crumbs. Then, add the softened cream cheese. This step is crucial as it ensures a uniform mixture that captures the flavor profile of the original cake while achieving the right consistency for shaping.
Step 2: Incorporate Graham Crackers
Mix in the crushed graham crackers gradually, stirring until fully incorporated. This not only affects the truffle's texture, creating a delightful contrast but also helps absorb excess moisture, ensuring that the final product maintains its shape during chilling.
Step 3: Chill the Mixture
Cover the bowl with plastic wrap and place it in the refrigerator for at least 1 hour. Chilling the mixture allows it to firm up, making it easier to roll into balls. This is a key step to prevent the truffles from becoming too sticky or misshapen during the rolling process.
Step 4: Form the Truffles
Once the mixture is firm, use a small cookie scoop or your hands to roll the mixture into bite-sized balls, about 1 inch in diameter. This is where you shape the truffles, and ensuring uniformity is important for presentation and even coating.
Step 5: Melt the White Chocolate
In a microwave-safe bowl, combine white chocolate chips with vegetable oil. Heat in short increments, stirring frequently until smooth. The oil helps create a glossy finish on your truffles. Proper melting is crucial; overheating can cause the chocolate to seize and lose its temper.
Step 6: Coat the Truffles
Dip each truffle into the melted white chocolate, ensuring it is fully coated. Use a fork to retrieve them, allowing excess chocolate to drip back into the bowl. This step is all about enhancing flavor and presentation, giving a creamy exterior that complements the sweetness of the filling.
Step 7: Finish with Sprinkles
Immediately after coating, sprinkle festive sprinkles on top of the wet chocolate. This adds a beautiful finish and festive touch to your truffles. Be sure to do this before the chocolate sets to ensure the sprinkles adhere properly.
Step 8: Chill to Set
Place the coated truffles back into the refrigerator for another 30 minutes to set the chocolate. This final chilling time solidifies the coating, ensuring that each truffle has a delightful crunch when bitten into. Patience here rewards you with elegantly finished truffles.

The Essence of Holiday Flavors
These truffles capture the nostalgic flavors of the beloved Christmas Tree Cakes, making them an instant hit during the holiday season. The combination of vanilla, sprinkle fun, and the creamy filling creates a unique, flavorful experience that resonates with both adults and kids alike.
Perfect for Gift Giving
Truffles are not only delightful to eat but also make a great homemade gift. Pack them in festive boxes or jars, tied with a ribbon, to spread holiday cheer to friends and family. The effort you put into making these treats is sure to warm hearts and create lasting memories.
Fun Variations to Consider
While this recipe pays homage to the original Little Debbie cake, feel free to get creative! Consider adding a splash of peppermint extract for a minty twist, or experiment with different types of chocolate coatings. Each variation can introduce a new flavor profile, keeping your holiday sweets exciting.
FAQs
What should I do if my truffle mixture is too dry?
If the mixture feels too dry and isn't holding together, add a bit more softened cream cheese to help bind it. Mix thoroughly until you achieve the desired consistency.
Can I use regular chocolate instead of white chocolate?
Absolutely! You can use milk or dark chocolate for a different flavor profile. Just ensure you adjust the melting process accordingly for best results.
What happens if my chocolate coating is too thick?
If your chocolate coating appears too thick, try adding a little more vegetable oil to thin it out. This can help you achieve a better consistency for coating.
Can I scale the recipe for a larger group?
Yes, you can easily double or triple the recipe to accommodate larger gatherings. Just ensure you have enough space in your fridge for the chilling process.
What if my truffles are losing their shape?
If your truffles are losing their shape, they might not have chilled long enough. Ensure the mixture is firm before rolling, and if they do become too warm, pop them back in the fridge briefly.
How can I make my truffles look more festive?
Enhance visual appeal by using colorful sprinkles or edible glitter for coating. You can also drizzle contrasting chocolate on top for a decorative touch.
Conclusion
Incorporating Little Debbie Christmas Tree Cakes into truffles is a delightful way to celebrate the holiday season. With minimal effort, you can create a sweet treat that brings smiles and warmth to any gathering.
Whether you enjoy them yourself or share them with friends and family, these truffles encapsulate the spirit of the holidays in every bite. Happy cooking, and enjoy every delicious morsel!
Recipe Card
Savory Garlic Herb Roasted Chicken Delight
Ingredients
- 1 whole chicken 4-5 lbs
- 1 head of garlic cloves separated
- 2 tablespoons olive oil
- 1 tablespoon fresh thyme chopped
- 1 tablespoon fresh rosemary chopped
- 1 tablespoon fresh parsley chopped
- 1 lemon cut into wedges
- Salt and pepper to taste
Instructions
- Preheat the oven to 425°F (220°C).
- Prepare the chicken by patting it dry with paper towels.
- Rub olive oil all over the chicken, inside and out.
- Season generously with salt and pepper.
- Stuff the cavity with garlic cloves and lemon wedges.
- Sprinkle the herbs over the chicken and inside the cavity.
- Place the chicken in a roasting pan and tuck the wing tips under.
- Roast the chicken for approximately 1 hour and 15 minutes.
- Let the chicken rest for 10-15 minutes before carving.
Notes
Additional serving suggestions: pair with a crisp salad, garlic bread, or roasted seasonal vegetables for balance.
For make-ahead, prep components separately and assemble just before heating to preserve texture.
Taste and adjust with acid (lemon/vinegar) and salt right at the end to wake up flavors.


