Introduction
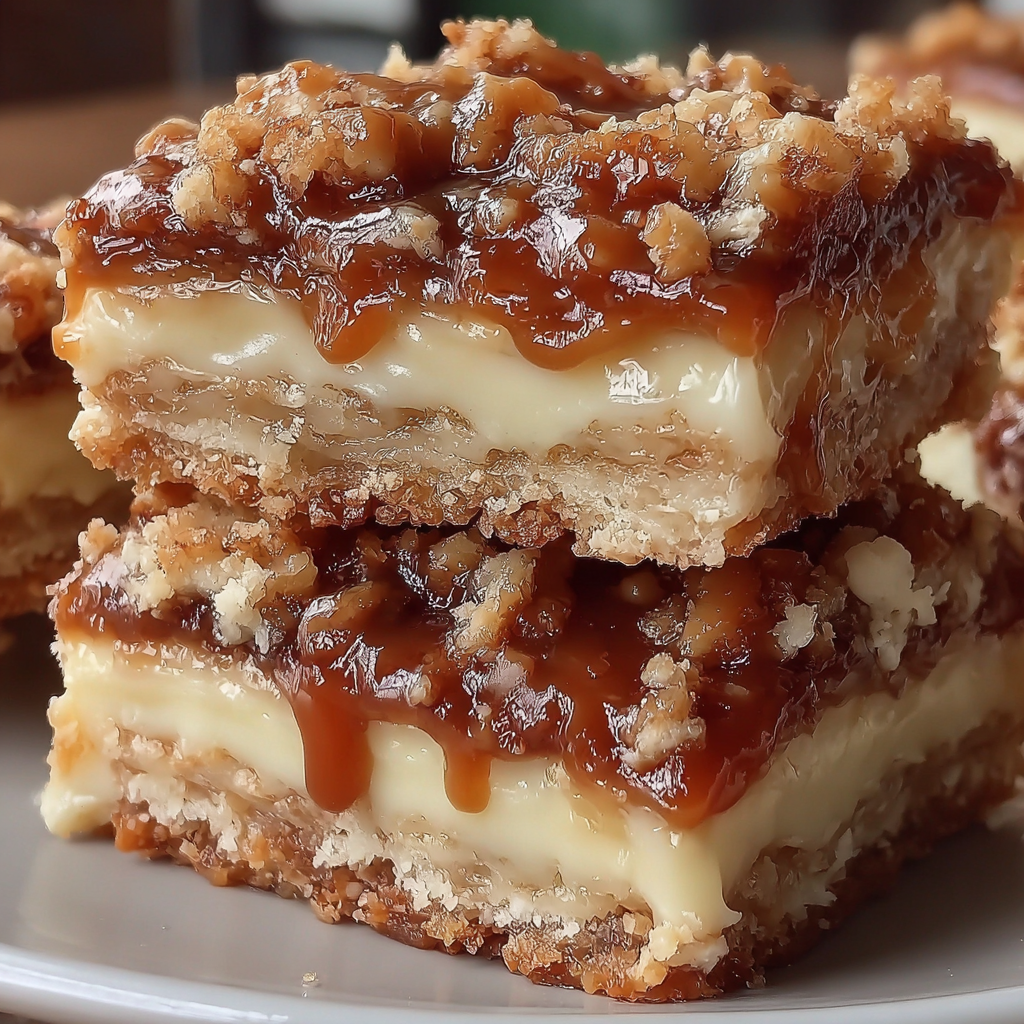
Trisha Yearwood has long been a beloved figure not just for her music, but also for her heartfelt cooking. Her Butterscotch Bars are a prime example of comfort food that strikes a perfect balance between sweetness and rich flavor. Ideal for gatherings or just a cozy night in, these bars promise to evoke a sense of nostalgia with every bite.
The combination of creamy butterscotch and a buttery, chewy texture makes these bars incredibly satisfying. What’s great about them is their simplicity; with the right ingredients and a little patience, anyone can recreate this sweet treat right in their own kitchen. Let’s dive into what makes these bars so special and how you can make them at home.
Ingredients
- 1 cup unsalted butter, softened
Unsalted butter is crucial for controlling the saltiness of the bars. It contributes to the rich, creamy texture that makes these butterscotch bars melt in your mouth. - 2 cups packed brown sugar
Brown sugar adds depth and moisture, giving the bars their signature chewy texture. The molasses in brown sugar also enhances the butterscotch flavor. - 2 large eggs
Eggs act as a binding agent, helping to combine the ingredients while also adding richness. They ensure that the bars have a tender crumb. - 1 teaspoon vanilla extract
Vanilla extract adds aromatic flavor, enhancing the overall taste of the butterscotch. It complements the sweetness and brings balance. - 2 cups all-purpose flour
Flour provides structure to the bars. It helps create that perfect chewy texture while allowing the flavors to shine through without overpowering them. - 1 teaspoon baking powder
Baking powder is a leavening agent that helps the bars rise slightly, giving them a light texture. It ensures they’re not too dense. - 1 teaspoon salt
Salt enhances all the flavors in the recipe, balancing out the sweetness of the butterscotch and brown sugar. - 1 cup butterscotch chips
The star of the show, butterscotch chips provide that signature flavor and sweetness. They melt into the bars, creating pockets of gooey goodness.
Directions & Preparation
Step 1: Preheat your oven to 350°F (175°C).
Preheating the oven is crucial for even baking. Starting with a hot oven ensures that the bars cook uniformly from the moment they're placed in, achieving the right texture.
Step 2: Grease a 9×13 inch baking pan.
Greasing the pan prevents sticking, allowing for easy removal once baked. You can also use parchment paper for added security, which will help lift the bars out cleanly.
Step 3: In a large mixing bowl, cream together the butter and brown sugar until smooth.
Creaming butter and sugar incorporates air into the mixture, which aids in leavening. This step is vital for achieving a light texture while also creating a rich flavor base.
Step 4: Add the eggs one at a time, mixing well after each addition, then stir in the vanilla.
Adding eggs one at a time ensures they are fully incorporated, leading to a smoother batter. The vanilla enhances the sweetness, making the bars even more aromatic.
Step 5: In a separate bowl, whisk together the flour, baking powder, and salt.
Whisking dry ingredients before combining them with wet ingredients ensures an even distribution of the leavening agent and salt, preventing any ‘pockets’ in the finished bars.
Step 6: Gradually add the dry mixture to the butter mixture, stirring just until combined.
Overmixing can lead to tough bars. Mixing until just combined will keep the texture chewy and tender, perfect for butterscotch bars.
Step 7: Fold in the butterscotch chips until evenly distributed.
Gently folding in the flavor-packed butterscotch chips ensures they are well-spread throughout the batter without deflating it.
Step 8: Spread the batter evenly in the prepared baking pan.
An even layer is key to ensure all parts of the bars bake uniformly. It prevents some areas from being overbaked while others are undercooked.
Step 9: Bake in the preheated oven for 20-25 minutes, or until the top is golden brown and a toothpick comes out clean.
Baking time varies slightly based on oven differences, so keep an eye on the bars. The goal is a golden top, indicating they are baked through without being overdone.
Step 10: Allow the bars to cool completely in the pan before cutting into squares.
Cooling is essential for the bars to set properly. Cutting them too soon may result in a messy presentation and affect their chewy texture.

Elevating the Butterscotch Flavor
For those wanting to deepen the butterscotch flavor, consider toasting the butterscotch chips lightly before adding them to the batter. This practice enhances the caramel notes and promotes a more complex flavor profile that will surely impress family and friends.
Adding Textures to the Bars
If you crave a bit of crunch, think about incorporating chopped nuts, like pecans or walnuts, into the batter. This addition not only diversifies the texture but also complements the soft, chewy feel of the bars, providing a delightful contrast with every bite.
Serving Suggestions for Butterscotch Bars
These butterscotch bars can serve as a stand-alone dessert, but consider pairing them with a scoop of vanilla ice cream or a dollop of whipped cream. The ice cream adds a creamy richness that contrasts beautifully with the sweet, chewy bars, making for an indulgent treat.
FAQs
What if my butterscotch bars come out too thick?
If your bars are too thick, it could be due to overmixing. Ensure to mix just until combined for the best texture, and check your baking time; slightly extending it might also help.
How can I ensure the bars are not too gooey after baking?
Make sure to let the bars cool completely before cutting. If they are too gooey, they may need additional baking time next batch, keeping a close watch towards the end.
Can I replace butterscotch chips with another type of chip?
Yes, feel free to substitute butterscotch chips with chocolate or peanut butter chips for a different flavor profile. Just ensure they blend well with the overall sweetness of the bars.
What can I do if my bars taste too sweet?
If the bars turn out overly sweet, you can adjust the brown sugar next time. Reducing it by a quarter cup can help balance the sweetness without compromising the texture.
Is there a way to make these bars more festive?
To add a festive twist, try incorporating spices like cinnamon or nutmeg or adding a drizzle of chocolate on top for a richer finish.
How can I make my butterscotch bars softer?
Adding an extra tablespoon of butter can help achieve a softer texture. Ensure not to overbake them to maintain soft, chewy bars.
Conclusion
Trisha Yearwood’s Butterscotch Bars embody a nostalgic charm appreciated by dessert lovers of all ages. Easy to make and incredibly satisfying, they are sure to bring joy to any gathering.
With their warm flavors and delightful texture, these bars are bound to become a staple in your recipe repertoire. Don’t hesitate to experiment with the ingredients and make them your own!
Recipe Card

Deliciously Simple Apple Slab Pie Recipe
Ingredients
- 2 ½ cups all-purpose flour
- 1 cup unsalted butter chilled and cubed
- 1 teaspoon salt
- ¼ cup granulated sugar
- 6 cups peeled and sliced apples such as Granny Smith and Honeycrisp
- ¾ cup brown sugar
- 1 teaspoon cinnamon
- 2 tablespoons cornstarch
- 1 tablespoon lemon juice
- 1 egg beaten (for egg wash)
Instructions
- Prepare the pie crust by mixing flour, salt, and sugar.
- Cut in the butter until the mixture resembles coarse crumbs.
- Add cold water slowly until the dough comes together.
- Preheat your oven to 375°F (190°C).
- Roll out the crust for the bottom layer and place it in a baking sheet.
- Prepare the apple filling by combining sliced apples with sugars, cinnamon, cornstarch, and lemon juice.
- Fill the crust with the apple mixture, fluffing it up.
- Roll out the top crust and place it over the apple filling.
- Brush the crust with the beaten egg.
- Bake for 45-55 minutes or until the filling is bubbly and the crust is golden.
- Let the pie cool before slicing.
Notes
Additional serving suggestions: pair with a crisp salad, garlic bread, or roasted seasonal vegetables for balance.
For make-ahead, prep components separately and assemble just before heating to preserve texture.
Taste and adjust with acid (lemon/vinegar) and salt right at the end to wake up flavors.


