Introduction
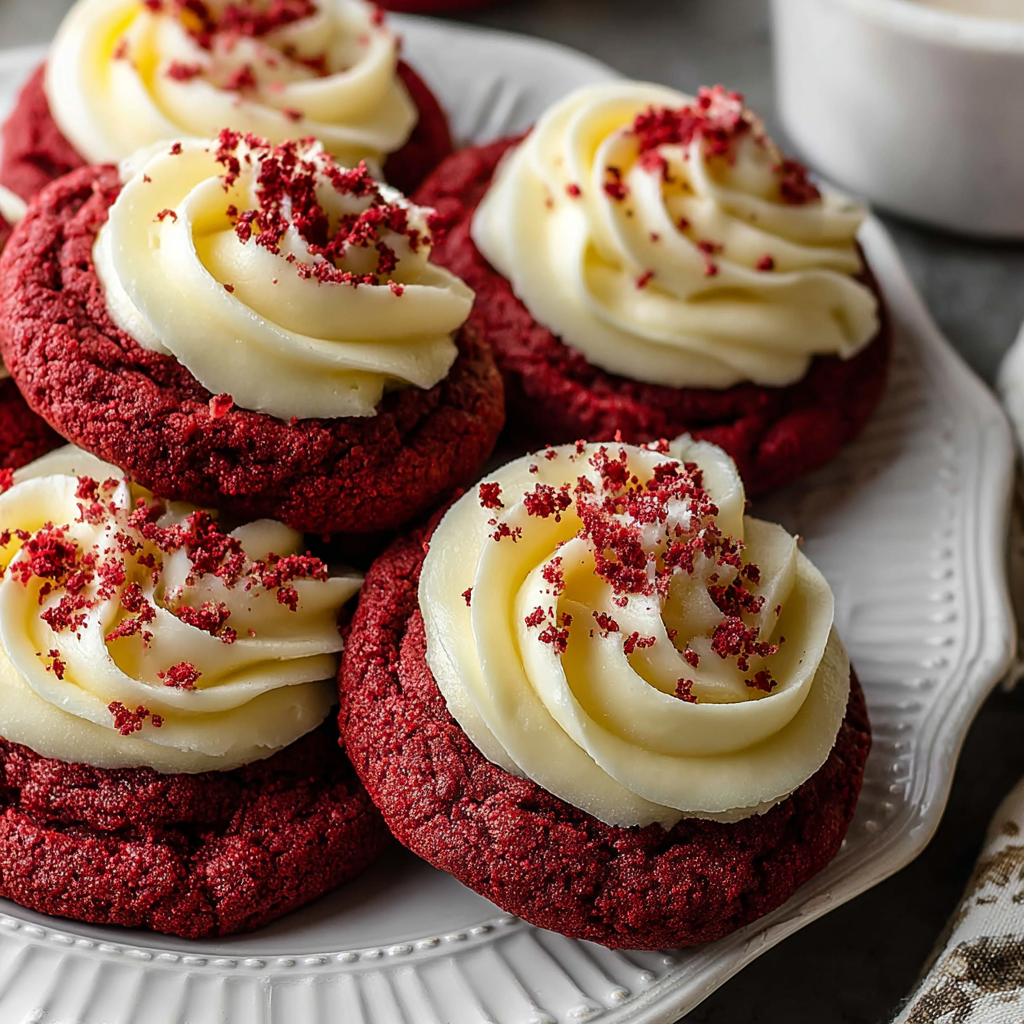
Red velvet treats have a way of stealing the show at any dessert table, and these frosted red velvet cupcake cookies are no exception. Combining the rich flavor and iconic color of red velvet cake with the joy of cookies, these treats bring a unique twist that's perfect for any occasion.
The soft, chewy texture of the cookies is enhanced by a smooth cream cheese frosting that adds a delicious contrast. Whether you're celebrating a special event or simply indulging in a sweet craving, these cookies offer a delightful blend of nostalgia and innovation.
Ingredients
- 2 cups all-purpose flour
All-purpose flour is the backbone of the cookie, providing structure. It helps achieve that perfect balance between chewiness and softness, essential for cookie texture. - 1 tablespoon cocoa powder
Cocoa powder adds depth to the flavor while also contributing to the cookie's rich red hue. A small amount is enough to enhance the overall taste without overpowering the signature red velvet flavor. - 1 teaspoon baking soda
Baking soda acts as a leavening agent, allowing the cookies to rise slightly while baking. This affects the texture, giving them the lightness that makes cookies airy and prevent them from being too dense. - 1 teaspoon salt
Salt intensifies the sweetness of desserts and balances flavors. It ensures that the cookies don't taste flat, allowing the other ingredients to shine through. - 1 cup unsalted butter, softened
Butter not only provides richness but also impacts the cookies' texture. Softened butter creams well with sugar, creating a fluffy base that helps the cookies spread evenly during baking. - 1 cup granulated sugar
Granulated sugar sweetens the cookies and helps achieve that desirable chewy texture. It also aids in browning, adding to the overall visual appeal of the baked goods. - 1/2 cup brown sugar, packed
Brown sugar adds moisture and a hint of caramel flavor due to its molasses content. This not only enhances taste but also ensures that the cookies have a soft interior. - 2 large eggs
Eggs add moisture and act as a binder, helping all the ingredients stick together. They also contribute to the structural integrity of the cookies. - 1 tablespoon vanilla extract
Vanilla extract delivers a warm, sweet aroma that elevates the cookie's overall flavor profile. It harmonizes beautifully with the other ingredients. - 1 tablespoon red food coloring
Food coloring is essential for creating the iconic red hue of red velvet cookies. It allows the cookies to stand out visually, making them as appealing as they are tasty. - 1/2 cup cream cheese, softened
Cream cheese forms the base for the frosting, adding a rich, tangy flavor that complements the sweetness of the cookies. Its creamy texture helps achieve a smooth frosting consistency. - 2 cups powdered sugar
Powdered sugar serves as the primary sweetener for the frosting, giving it a perfectly sweet flavor that contrasts beautifully with the slight tanginess of the cream cheese. - 1 teaspoon milk
Adding milk to the frosting adjusts the consistency, making it spreadable without sacrificing flavor. It ensures the frosting is creamy and easy to work with.
Directions & Preparation
Step 1: Preheat your oven to 350°F (175°C) and line a baking sheet with parchment paper.
Starting with a preheated oven is essential for consistent baking results. Lining your baking sheet ensures easy cleanup and prevents sticking, allowing for perfect cookie removal after baking.
Step 2: In a bowl, whisk together the flour, cocoa powder, baking soda, and salt; set aside.
Whisking the dry ingredients together helps distribute the baking soda and salt evenly throughout the flour. This promotes uniform cookie texture and ensures that your cookies rise consistently while baking.
Step 3: In another bowl, cream the softened butter, granulated sugar, and brown sugar together until light and fluffy.
Creaming the butter and sugars creates air pockets that contribute to the cookie’s rise and texture. The fluffiness achieved during this step is crucial for achieving that perfect melt-in-your-mouth effect.
Step 4: Add the eggs, vanilla extract, and food coloring to the butter mixture; beat until well combined.
Incorporating eggs, vanilla, and food coloring now ensures they blend well into the cookie base. The food coloring achieves a vibrant red hue, while the eggs contribute moisture and assist in binding.
Step 5: Gradually add the dry ingredients to the wet mixture, mixing just until combined. Do not overmix.
Mixing the dry ingredients in gradually prevents clumping and ensures an even texture without overworking the dough. Overmixing can lead to tough cookies, so it's crucial to mix only until no dry flour remains visible.
Step 6: Scoop tablespoon-sized portions of the dough and place them on the prepared baking sheet, leaving space between each dough ball.
Scooping uniform dough portions ensures that the cookies bake at the same rate, resulting in evenly sized cookies. Leaving space is necessary for the cookies to spread while baking without merging into one another.
Step 7: Bake in the preheated oven for 10-12 minutes, or until cookies are set but still soft.
That sweet spot of baking time is crucial to ensure you achieve that perfect chewy texture. Removing cookies when they appear slightly under-baked allows them to continue cooking as they cool, resulting in a delectable end product.
Step 8: While the cookies cool, prepare the frosting by beating the cream cheese, powdered sugar, and milk together until smooth.
Beating the frosting ingredients well ensures a creamy consistency that's easy to spread. Adjusting milk to reach your desired texture guarantees the frosting will not be too thick or runny, enhancing your cookie experience.
Step 9: Once cookies are completely cool, frost them with the cream cheese frosting.
Frosting the cookies only when cool prevents the heat from melting the frosting. Generous frosting application enhances both flavor and visual appeal, turning your cookies into delightful treats.
Step 10: Serve immediately or store in an airtight container.
Serving the cookies shortly after frosting allows the flavors to mingle while keeping the texture pleasant. Storing them properly prevents them from drying out, ensuring everyone gets to enjoy their soft and chewy goodness.

The Art of Achieving the Perfect Red Hue
Getting the perfect shade of red in your cookies is more than just adding food coloring; it’s about balance. The amount of food coloring you use can significantly affect the final color. If you want a deeper red, feel free to adjust the quantity, but keep in mind that too much can alter the flavor. Aim for a bright but balanced color that evokes the classic red velvet look without overwhelming.
Variations on Flavor: Add-Ins to Consider
While the cookies are delightful on their own, experimenting with various mix-ins can elevate their flavor further. Consider adding mini chocolate chips, chopped pecans, or even a splash of espresso powder for a richer taste. These small alterations can add layers of complexity to your cookies, making every bite a new experience.
Frosting Techniques: Mastering the Spread
Frosting your cookies doesn’t have to be complicated. Using an offset spatula or the back of a spoon can create beautiful swirls and patterns on top of your cream cheese frosting. For a creative twist, pipe the frosting for a more decorative presentation. Your frosting technique can turn these simple cookies into elegant treats that impress guests at any gathering.
FAQs
What can I do if my cookies come out too dry?
If your cookies turn out dry, they might have been overbaked. For future batches, keep an eye on the timer and pull them out of the oven as soon as they look set but still soft in the center.
Can I use natural cocoa powder instead of Dutch-process cocoa?
Yes, natural cocoa powder can be used, but it may yield a slightly different flavor profile. Just keep in mind the acidity balance, as it reacts with baking soda for leavening.
Why did my cookies spread too much during baking?
Overmixing the dough or using melted butter can lead to excessive spreading. Ensure that you only mix until combined and use softened butter, not melted, for the right consistency.
What if my frosting is too thick?
If your frosting is too thick, simply add a teaspoon of milk at a time until it reaches your desired consistency. Be cautious not to add too much at once.
Can I replace the butter with margarine in this recipe?
You can substitute margarine for butter, but the texture may be slightly different. Aim for a stick version for consistent results similar to butter.
What should I do if my cookies end up tasting bland?
Bland cookies can often be cured with a pinch more of salt or vanilla. For future batches, consider adjusting these ingredients to enhance overall flavor.
Conclusion
These frosted red velvet cupcake cookies are not only delicious but also visually stunning. With their soft texture and rich flavor, they’re sure to become a favorite in your baking repertoire.
By mastering this recipe, you’ll add a lovely option to your dessert lineup, perfect for any gathering or just an indulgent treat for yourself. So grab your ingredients and start baking today!
Recipe Card

Pumpkin Cheesecake Truffles for Autumn Indulgence
Ingredients
- 8 oz cream cheese softened
- 1 cup pumpkin puree
- 1/2 cup powdered sugar
- 1 teaspoon vanilla extract
- 1 teaspoon pumpkin pie spice
- 1 cup chocolate chips milk or dark
- 1 tablespoon coconut oil
Instructions
- Make the pumpkin cheesecake mixture.
- Chill the mixture.
- Shape the truffles.
- Prepare the chocolate coating.
- Coat the truffles in chocolate.
- Allow to set.
- Serve and enjoy.
Notes
Additional serving suggestions: pair with a crisp salad, garlic bread, or roasted seasonal vegetables for balance.
For make-ahead, prep components separately and assemble just before heating to preserve texture.
Taste and adjust with acid (lemon/vinegar) and salt right at the end to wake up flavors.


