
Introduction
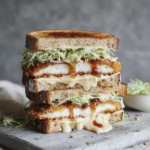
The Chicken Katsu Sandwich is a delightful fusion of Japanese cuisine and comfort food, perfect for a quick lunch or dinner. Its contrast of crunchy chicken cutlets with a lush, savory sauce makes for a truly satisfying meal.
Traditionally served in a soft ciabatta or a fluffy milk bun, this sandwich brings together crispy breadcrumbs and tender chicken, all while showcasing the rich flavors of tonkatsu sauce. By making it at home, you bring a personal twist to a beloved classic.
Ingredients
- 2 boneless, skinless chicken thighs
Chicken thighs are juicy and flavorful, offering a richer taste than breasts, especially when fried. Their higher fat content keeps them moist during cooking. - 1 cup panko breadcrumbs
Panko breadcrumbs provide an extra crunch thanks to their coarse texture. They absorb less oil than regular breadcrumbs, resulting in a lighter fry. - 1/2 cup all-purpose flour
All-purpose flour creates a light coating that helps the egg adhere to the chicken. It also contributes to the crispiness of the fried layer. - 1 large egg
The egg acts as a binding agent, allowing the breadcrumbs to adhere to the chicken while also helping create a golden-brown crust. - Oil for frying (about 2 cups)
Using a neutral oil is essential for frying. It should have a high smoke point to ensure the chicken cooks evenly without burning. - 4 slices of milk bread or ciabatta
A soft bread, like milk bread, complements the crunchy chicken while soaking up the flavors without falling apart. - 4 tablespoons tonkatsu sauce
Tonkatsu sauce is a rich, tangy condiment that enhances the flavor of the chicken katsu. It provides a delicious umami kick that pulls the sandwich together. - Shredded cabbage, for serving
Fresh cabbage adds a crisp texture and a refreshing crunch, balancing the heaviness of the fried chicken. - Sliced cucumbers, for garnish (optional)
Sliced cucumbers add a nice crunch and brightness to the sandwich, enhancing both flavor and presentation.
Directions & Preparation
Step 1: Prepare the chicken
Start by flattening the chicken thighs to an even thickness. This ensures they cook uniformly, preventing any undercooked or dry portions. Use a meat mallet or rolling pin, placing the chicken between two sheets of plastic wrap to avoid mess. Season both sides with salt and pepper to enhance the chicken's natural flavors.
Step 2: Set up the breading station
Arrange three shallow dishes: one for the flour, one for the beaten egg, and one for the panko breadcrumbs. This assembly line allows for a smooth breading process. Make sure to coat the chicken lightly in flour first, as this helps the egg stick and avoids excess moisture that could make the breadcrumbs soggy.
Step 3: Breading the chicken
Dredge the chicken in flour, shaking off any excess, then dip it into the beaten egg before coating it thoroughly with panko. Press down slightly to ensure the breadcrumbs adhere well. This layer will provide that delightful crunch when fried, so take your time to cover every surface evenly.
Step 4: Heat the oil
In a heavy-bottomed pot or deep skillet, heat about 2 inches of oil over medium-high heat until it reaches 350°F (175°C). A thermometer is helpful here, as the oil temperature is crucial for achieving the right crispness. If the oil is too cool, the chicken will absorb it, resulting in a soggy exterior.
Step 5: Fry the chicken
Carefully lower the breaded chicken into the hot oil, frying in batches if necessary to avoid overcrowding. Fry for about 4-5 minutes per side or until golden brown. Use tongs to flip the chicken, ensuring it cooks evenly. Monitoring the temperature and adjusting the heat as necessary will keep the oil from smoking or cooling down.
Step 6: Drain and rest
Once the chicken is golden and cooked through, remove it from the oil and let it drain on a plate lined with paper towels. This step is vital to remove excess oil and maintain crispiness. Allowing the chicken to rest a few minutes before slicing helps retain its juices.
Step 7: Assemble the sandwich
Spread a generous amount of tonkatsu sauce on the bottom slice of the bread, then layer with the fried chicken, shredded cabbage, and cucumber slices if desired. Finish with another slice of bread on top. Press gently to hold everything together, ensuring each bite has all the flavors.
Step 8: Serve immediately
For the best experience, serve the chicken katsu sandwich right away while it's still hot and crispy. Accompany it with a side of pickles or chips for a delightful crunch, and enjoy the savory flavors of this delicious fusion sandwich.

Choosing the Right Chicken Cut
Opting for chicken thighs rather than breasts provides a succulent bite to your katsu sandwich. The thighs' richness not only keeps the meat juicy during frying, but also enhances the overall flavor profile of the dish, making each bite a satisfying experience.
The Art of Frying
Frying requires a bit of attention to temperature and timing. Ensuring that the oil is hot enough before introducing the chicken is key to achieving that crispy finish. When the chicken hits the oil, the immediate sizzle begins to create a barrier that locks in moisture, preventing the meat from becoming greasy.
Elevating Your Sandwich with Toppings
While the traditional toppings include shredded cabbage, consider adding other fresh ingredients to enhance flavor and texture. Avocado slices or fresh herbs like cilantro can introduce a new layer of taste, while still maintaining the essence of the katsu sandwich. Feel free to experiment!
FAQs
What should I do if my chicken katsu is too thick and not cooking through?
If the chicken is too thick, it may require longer frying time or a lower heat to avoid burning the crust. Consider slicing the chicken thinner or gently pounding it to ensure even cooking.
How can I make my tonkatsu sauce more flavorful?
To enhance the flavor of your tonkatsu sauce, try adding a splash of soy sauce or a hint of sesame oil for depth. This can elevate the umami profile, making it even more delicious.
What can I use if I don’t have panko?
If you don't have panko breadcrumbs, you can substitute with regular breadcrumbs, but the texture will vary. For extra crunch, consider crushing crispy rice cereal as an alternative.
Is there a way to add a spicy kick to the sandwich?
Consider adding a layer of wasabi mayo or a drizzle of sriracha on the sauce to introduce a spicy element to your chicken katsu sandwich, complementing the crunch with heat.
Can I use an air fryer for chicken katsu?
Yes, you can use an air fryer for chicken katsu. Preheat it to 400°F and cook the breaded chicken for about 10-12 minutes, flipping halfway through for an evenly crisp finish.
What are some unique sauces to pair with katsu?
Beyond tonkatsu sauce, you can try spicy mayo, miso mayonnaise, or even a zesty citrus sauce to add different flavor dimensions to your sandwich.
Conclusion
Creating a Chicken Katsu Sandwich at home is not just about mixing ingredients; it’s about perfecting the balance of flavors and textures. With crispy fried chicken, fresh toppings, and savory sauce, each bite is a testament to culinary creativity.
Whether you enjoy it with classic accompaniments or introduce your own variations, this sandwich promises a delightful experience for any meal. Enjoy crafting this comforting dish in your own kitchen!
Recipe Card
Savoring a Chicken Katsu Sandwich Experience
Ingredients
- 2 boneless skinless chicken thighs
- 1 cup panko breadcrumbs
- 1/2 cup all-purpose flour
- 1 large egg
- Oil for frying about 2 cups
- 4 slices of milk bread or ciabatta
- 4 tablespoons tonkatsu sauce
- Shredded cabbage for serving
- Sliced cucumbers for garnish (optional)
Instructions
- Prepare the chicken
- Set up the breading station
- Breading the chicken
- Heat the oil
- Fry the chicken
- Drain and rest
- Assemble the sandwich
- Serve immediately
Notes
Additional serving suggestions: pair with a crisp salad, garlic bread, or roasted seasonal vegetables for balance.
For make-ahead, prep components separately and assemble just before heating to preserve texture.
Taste and adjust with acid (lemon/vinegar) and salt right at the end to wake up flavors.


