Introduction
Tonkotsu ramen, with its rich and creamy broth, transports you to the streets of Japan with each comforting spoonful. This beloved dish combines labor-intensive techniques and intricate flavors, rewarding your efforts with an unforgettable experience.
At its core, tonkotsu ramen is about crafting a deeply satisfying pork bone broth, enriched with a medley of toppings that bring texture and flavor to the dish. While it does take time, the journey is as enjoyable as the final bowl.
Ingredients
- Pork bones (neck bones, trotters) – 2-3 lbs
The cornerstone of tonkotsu ramen, pork bones create the rich, gelatinous broth that is the hallmark of this dish. The marrow and collagen render into the broth during the long cooking process, giving it a creamy texture. - Water – 12 cups
Water is essential for boiling the pork bones. It helps extract flavors and nutrients, transitioning from plain water to the nourishing stock that becomes the base of the ramen. - Soy sauce – 1/4 cup
Soy sauce adds depth and umami to the broth, balancing the richness of the pork. It introduces saltiness and complements the flavors of the other ingredients. - Mirin – 2 tablespoons
This sweet rice wine brings a touch of sweetness to the broth, enhancing complexity. It helps round out flavors and cuts through the richness of the pork. - Green onions – 2 stalks, chopped
Chopped green onions provide a fresh, aromatic finish to the ramen. They add color and a mild oniony flavor that contrasts nicely with the richness of the broth. - Soft-boiled eggs – 4
Soft-boiled eggs, often marinated, add creaminess and a luxurious finish to the bowl. The runny yolk enhances the broth's richness and provides a fulfilling element. - Ramen noodles – 4 servings
Ramen noodles are the heart of the dish. Their chewy texture absorbs the flavorful broth and creates a satisfying experience with each bite. - Chashu pork – 1 lb
Chashu is the slow-braised pork that adds tenderness and flavor. It acts as a delicious protein component, meant to melt in your mouth. - Nori (seaweed) – for garnish
Nori adds a savory, oceanic note to your bowl. It's a traditional topping that enhances flavor and contributes to the overall aesthetic. - Sesame seeds – for garnish
Toasted sesame seeds provide a nutty crunch that contrasts with the softer elements of the ramen. They add an extra layer of flavor and texture.
Directions & Preparation
Step 1: Prepare the pork bones by soaking them overnight in cold water.
Soaking the pork bones helps to remove impurities and blood, leading to a cleaner broth. This step is crucial for achieving the characteristically rich and clear pork flavor without unwanted bitterness.
Step 2: Rinse the soaked bones and add them to a large pot with the water. Bring to a boil, then simmer.
Bringing the bones to a boil and then simmering is key to extracting collagen and gelatin, creating that desired creamy broth. Skim off any scum that rises to the surface during the first boil to keep the broth clean.
Step 3: Allow the broth to simmer for at least 12 hours, adding water as necessary.
Long simmering releases flavors and nutrients from the bones. This extended cooking time is essential for achieving the signature richness and depth that defines true tonkotsu ramen.
Step 4: While the broth cooks, prepare the chashu pork by marinating it with soy sauce, mirin, and sugar, then slow-cooking it for 2-3 hours.
Creating perfectly tender chashu is vital for tonkotsu ramen. Marinating infuses the pork with flavor while the slow cooking allows it to become fork-tender, enhancing the overall dish.
Step 5: Once the broth is rich and creamy, strain it to remove bones and impurities.
Straining the broth ensures a smooth texture, free from any gritty residue, enhancing the overall mouthfeel of your soup. This step marks the transition from raw ingredients to your desired finished broth.
Step 6: Cook the ramen noodles according to package instructions.
Cooking the noodles separately ensures they remain firm and don’t become mushy in the broth. Their texture is essential for providing that perfect slurp that ramen is known for.
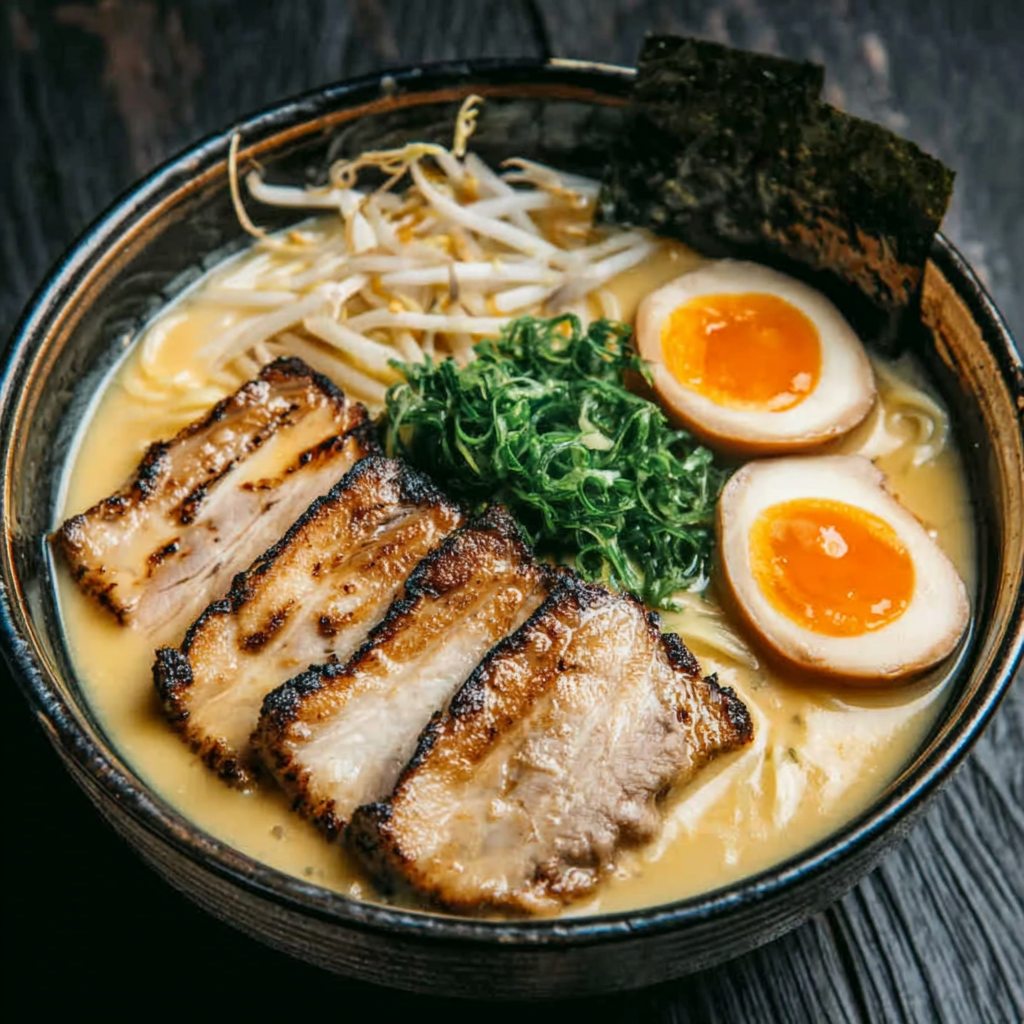
Step 7: Assemble the ramen bowls by placing noodles first, followed by the broth, chashu, halved soft-boiled eggs, green onions, nori, and sesame seeds.
The assembly is where presentation meets flavor. Start with the noodles to allow the broth to soak in, and layer the toppings artfully to create a visually appealing and flavorful dish.
Step 8: Serve immediately, enjoying each element of your homemade tonkotsu ramen.
Serving the ramen immediately after assembly ensures that the noodles stay firm and the broth is hot, creating the best possible eating experience. This final step is all about enjoying the fruits of your labor!

Crafting the Perfect Broth Takes Time
The hallmark of tonkotsu ramen lies in its broth, which is achieved through a lengthy cooking process. Patience is essential as the flavor evolves over hours of simmering. The bones slowly release their gelatin and flavor, creating a rich, broth that is at the core of this dish. A quick boil won’t do, so plan your cooking time wisely to savor the full potential of your broth.
Exploring Toppings for Personal Flair
While traditional toppings like chashu and soft-boiled eggs are classic choices, feel free to explore and personalize your bowl. Additions such as bamboo shoots, narutomaki (fish cake), or even spicy ground pork can enhance flavor and texture. Every topping plays a role in contributing to the unique experience of your tonkotsu ramen, allowing each bowl to reflect your personal culinary style.
The Art of Noodle Selection
The type of ramen noodle you choose impacts your final dish significantly. Fresh noodles provide the best texture, but there are also excellent dried options available. Look for wavy noodles, which capture the broth better. No matter the choice, cooking them to the right doneness—al dente—is vital to ensuring they soak in flavor without disintegrating in the broth.
FAQs
What if my broth is too thin?
If your broth lacks body, increase the simmering time or add more bones. Straining is also important; ensure you extract all the collagen and gelatin from the bones.
Can I substitute the pork with chicken?
While tonkotsu ramen traditionally uses pork, using chicken bones can result in a lighter broth. However, it will lack the signature richness that pork provides.
What do I do if my soft-boiled eggs are overcooked?
If overcooked, the yolk will be hard rather than runny. Aim for a cook time of around 6-7 minutes for silky yolks. If unappetizing, you can simmer them in soy sauce to enhance flavor.
How can I make my ramen spicier?
To add heat, consider incorporating chili oil or sliced fresh chilies into the broth or as a topping. This allows you to control the spice level in your bowl.
What if the noodles become too mushy?
Overcooking noodles in the broth will result in a mushy texture. Ensure to cook them separately and briefly; this preserves their bite and allows for a pleasant eating experience.
What can I do if my chashu pork isn’t tender enough?
If your chashu isn’t as tender as desired, continue cooking it slowly in its marinade. The meat needs time to absorb flavors and become fork-tender.
Conclusion
Making tonkotsu ramen from scratch is a rewarding culinary challenge that allows you to explore rich flavors and textures. Embrace the process, as each step contributes to the final masterpiece of flavors.
With practice, your tonkotsu ramen can evolve into a dish that impresses family and friends while satisfying your cravings. Enjoy the journey and every delicious bowl you serve.
Recipe Card

Apple Whiskey Bacon Jam: A Sweet & Smoky Spread
Ingredients
- 2 cups diced apples
- 1 cup cooked bacon chopped
- 1/2 cup whiskey
- 1/2 cup brown sugar
- 1/4 cup apple cider vinegar
- 1 tablespoon Dijon mustard
- 1/2 teaspoon black pepper
- 1/4 teaspoon cayenne pepper
Instructions
- Prepare the bacon.
- Sauté the apples.
- Add bacon and whiskey.
- Incorporate the remaining ingredients.
- Cook until thickened.
- Cool and jar the jam.
Notes
Additional serving suggestions: pair with a crisp salad, garlic bread, or roasted seasonal vegetables for balance.
For make-ahead, prep components separately and assemble just before heating to preserve texture.
Taste and adjust with acid (lemon/vinegar) and salt right at the end to wake up flavors.


